A Beginner's Guide to Real 3D Modeling with 3D Gaussian Splatting
Back to TopTo reach a broader audience, this article has been translated from Japanese.
You can find the original version here.
Recommended for
#- Interested in 3D scanning, particularly techniques for reconstructing 3D objects and spaces using video
- Want to digitally preserve your favorite collections or scenery
- Want to create realistic 3D models without spending money
Introduction
#Our company focuses on modeling technology.
In system design, we primarily leverage UML to model systems and excel at taking an objective bird’s-eye view of the entire system. Here, unlike our usual purpose of “overviewing the whole system,” we will explain modeling (3D reconstruction techniques) aimed at “digitally reproducing the real world exactly as it is.”
Where 3D Reconstruction Is Used
#Examples include the following:
- Digital space simulations faithful to the real world
- Example: Autonomous Driving
- Immersive VR content using VR devices
- Example: VRchat with MetaQuest3
- Preservation of buildings or ruins as historical records (digital archives)
- Example: Shuri Castle Restoration
Applications Used
#System Requirements and Specs
#- OS: Windows 11 Home 25H2
- CPU: Intel Core i7-11700K
- RAM: 64 GB (DDR4-3200; can run with less)
- GPU: NVIDIA GeForce RTX 4060 Ti (16 GB VRAM version used; LichtFeldStudio recommends 8 GB+ VRAM)
- CUDA Toolkit: 12.1 (LichtFeldStudio recommends 12.8+, but this version has been confirmed to work)
What is 3D Gaussian Splatting (3DGS)
#It is a 3D reconstruction technique proposed in 2023[1] that constructs 3D models using a large number of 3D Gaussian distributions.
Compared to conventional 3D representation methods, it offers higher expressive capability for transparent objects and glossy (specular) surfaces, while keeping rendering lightweight. The figure below shows an overview of a 3D Gaussian distribution in this technique. In simple terms, it can be described as “a translucent ellipsoid whose color changes depending on the viewpoint (where you look from).”
When you think of an ellipsoid, you might imagine a shape like a rugby ball or an almond chocolate. Without scale constraints, depending on the aspect ratio it can even look like a needle. Generally being translucent, it might bring to mind the appearance of mist. By assigning “opacity” to such ellipsoids, you can realistically reproduce translucent objects like glass or the distribution of light.
Moreover, the color-changing property depending on viewpoint is exactly the key of 3DGS, enabling rendering of glossiness that was difficult to express before. This technique uses a special function called Spherical Harmonics (SH).

By placing a large number of these ellipsoids with their parameters into space, objects and scenes are represented. Their arrangement is determined based on the videos of the object or space you want to reproduce.

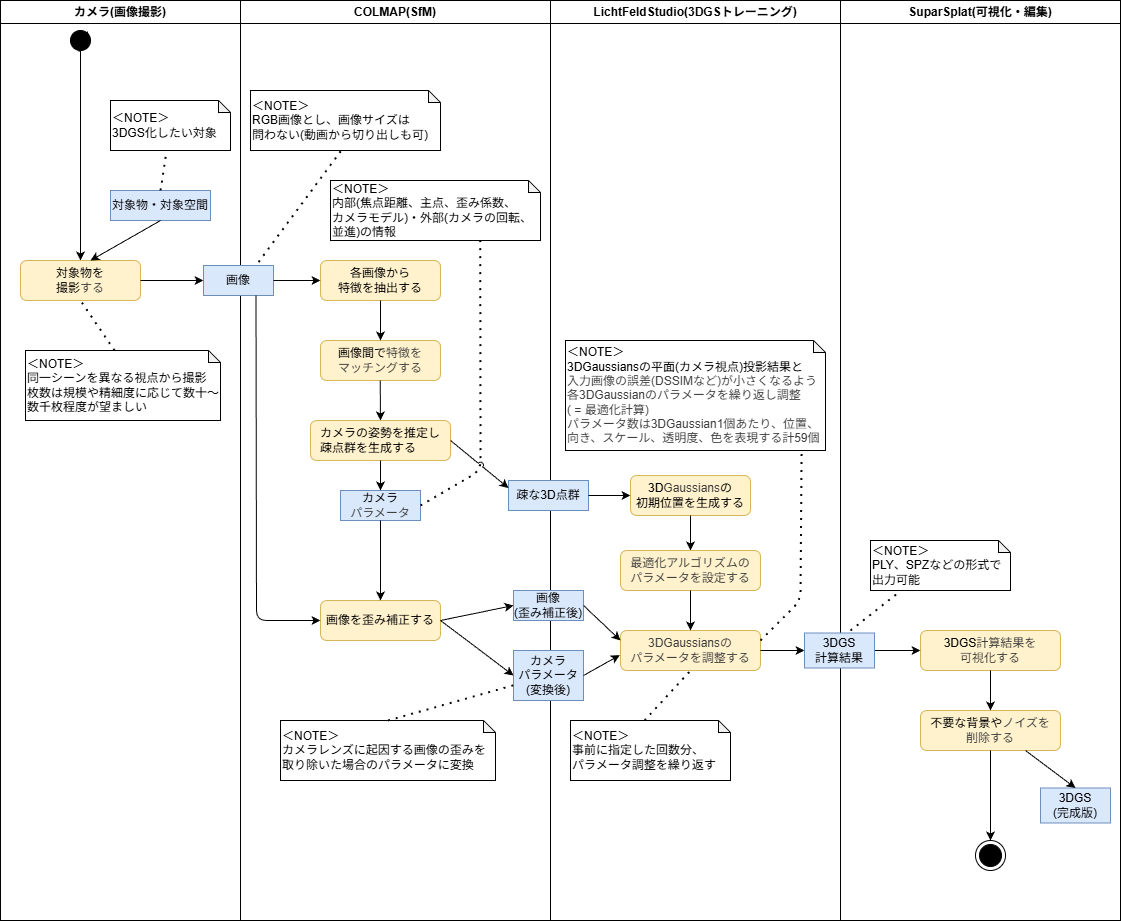
Workflow
#- Capture: Take photographs of the subject (object or space).
- Point Cloud Generation: Compute the rough 3D shape (point cloud) represented by points from the captured photos.
- 3DGS Creation: Compute the 3DGS based on the generated point cloud (think of the point cloud as “bones” and this step as “fleshing out”).
- Editing: Edit the created 3DGS to finalize it.
1. Capture
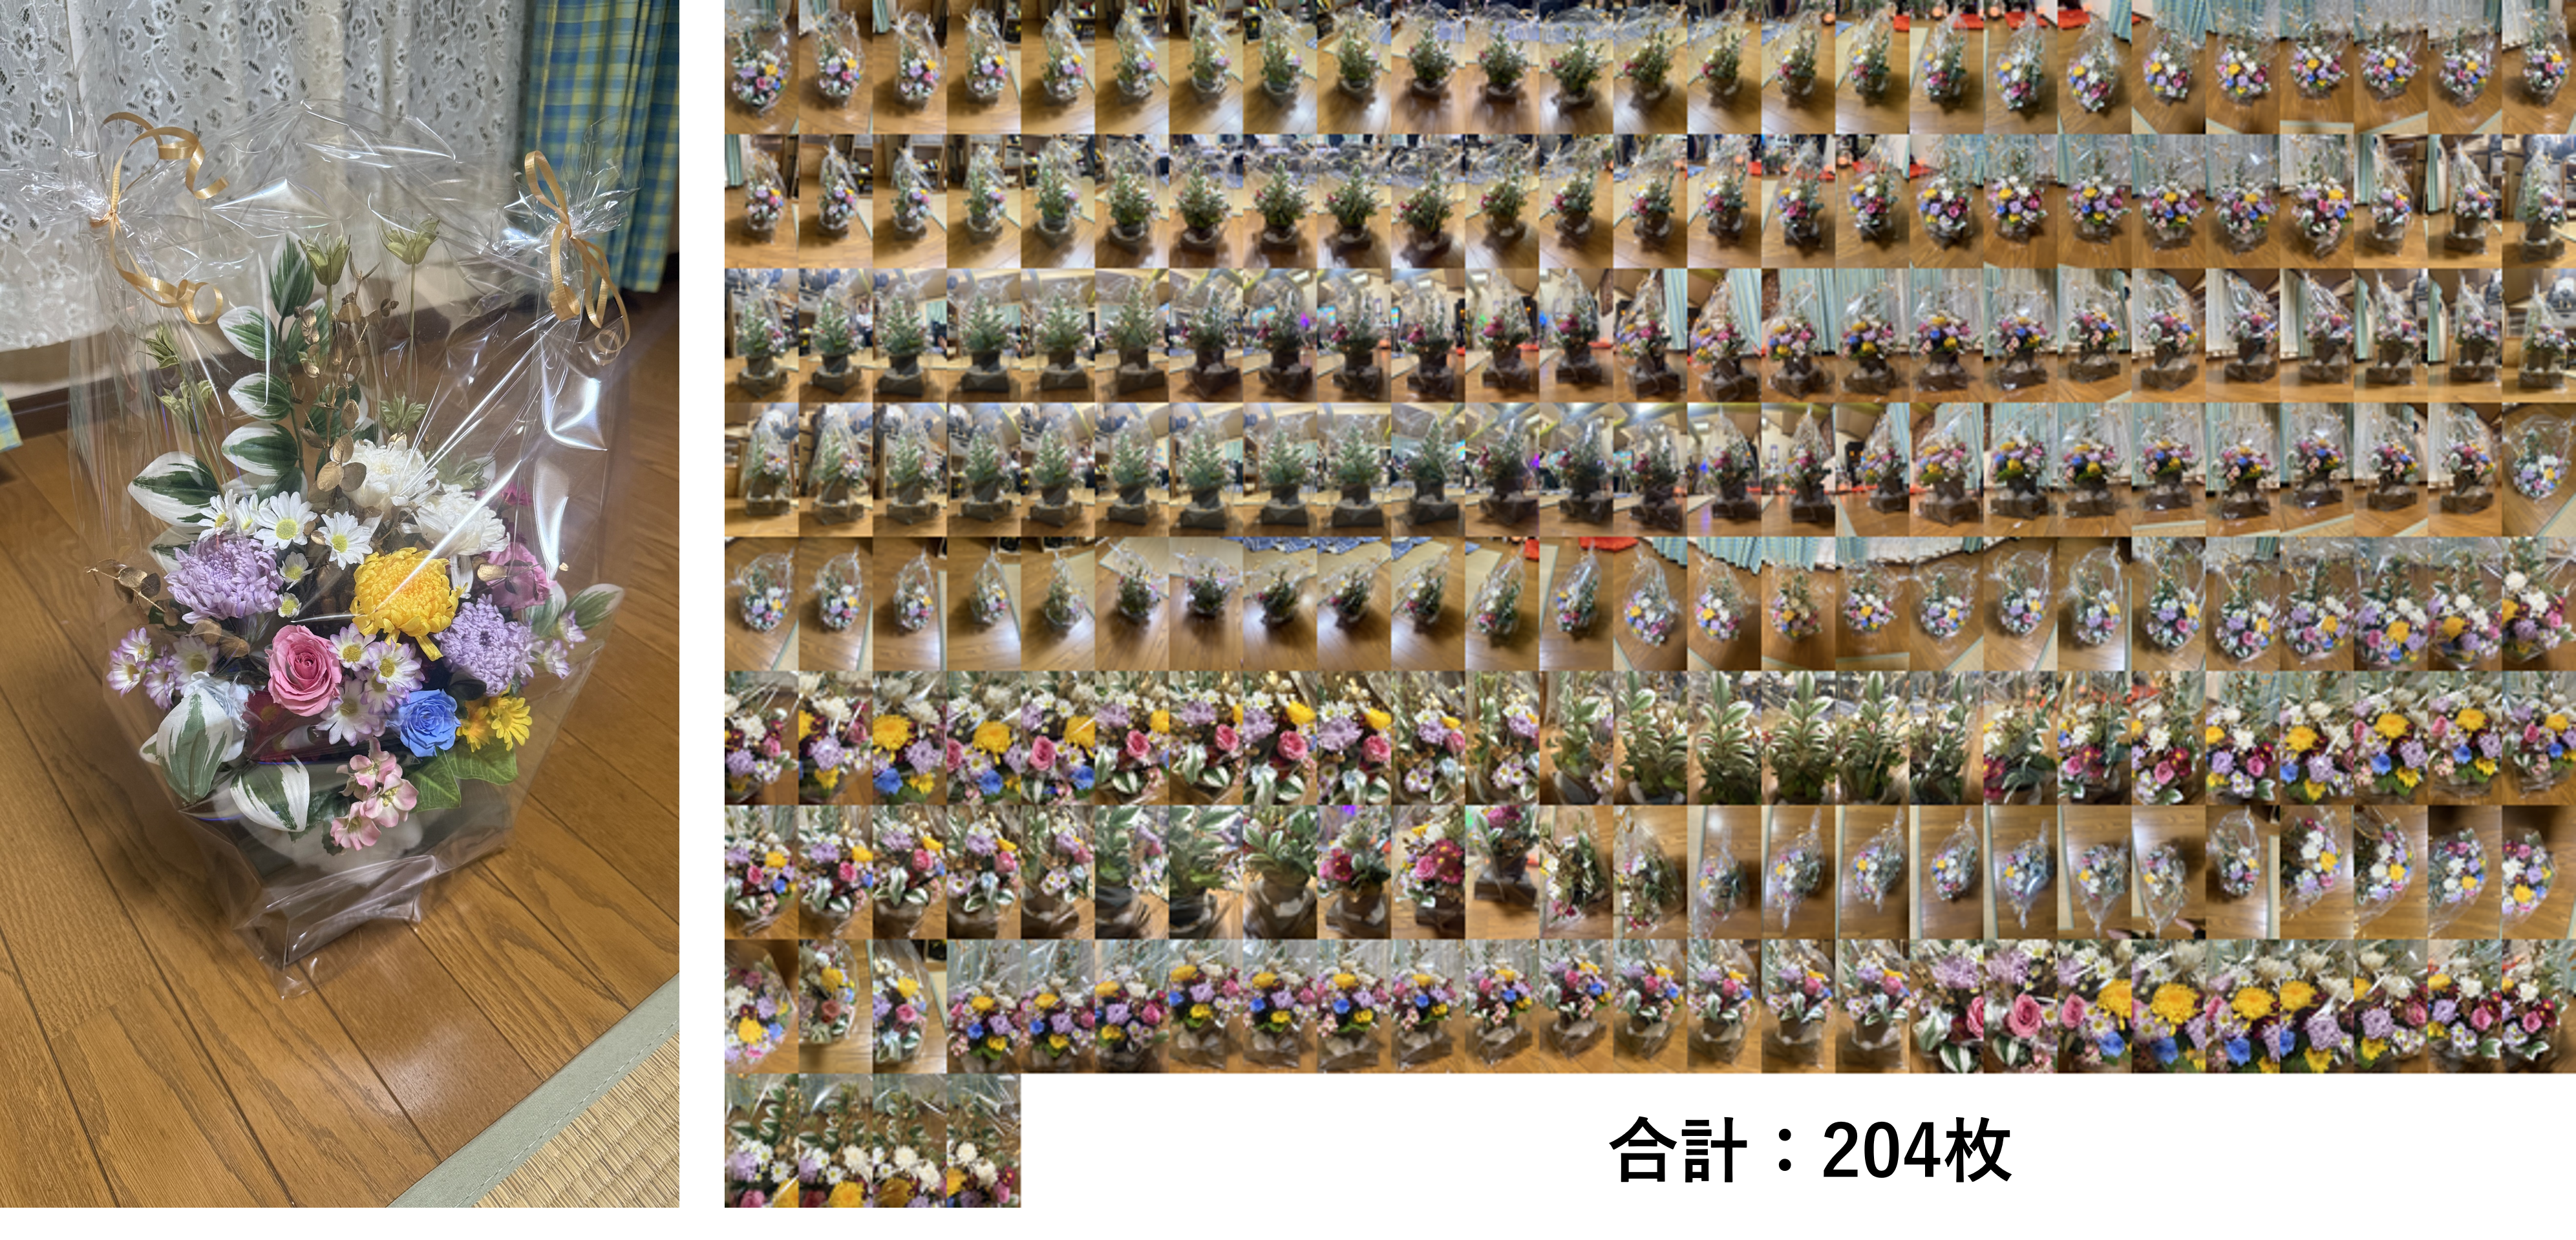
#In this example, our subject is a bouquet of flowers like the one below.
The key is to photograph the subject from all around at various vertical angles. If you want to increase the final 3DGS resolution, you can include close-up or optical-zoom images. We took a total of 204 photos.
The shooting conditions were as follows:
- Camera: iPhone 16 Pro
- Focal length: 24 mm (fixed)
- Resolution: 24 MP (24 million pixels)
- Exposure: 0.0 (default setting)
- Flash: None (indoor lighting only)
You can mix images taken with different focal lengths and resolutions.
2. Point Cloud Generation
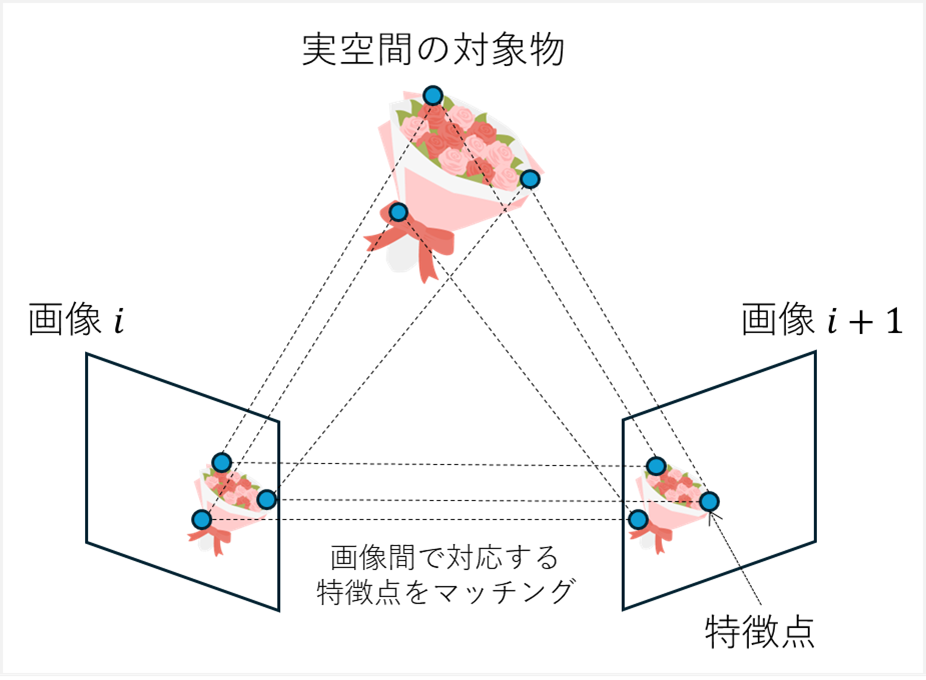
#Using a method called Structure from Motion (SfM), we reconstruct the original 3D object or space from the captured images. This technique extracts feature points from each image and matches them across images to estimate what is located where in the 3D space. The output of this process is a 3D point cloud with RGB information. Although there are many SfM applications, here we use the open-source COLMAP for its ease of use, relying mostly on default settings.
- Download the latest version of COLMAP and extract it (current version: 3.13.0).
- In the extracted folder, click “COLMAP.bat” to launch the COLMAP GUI.
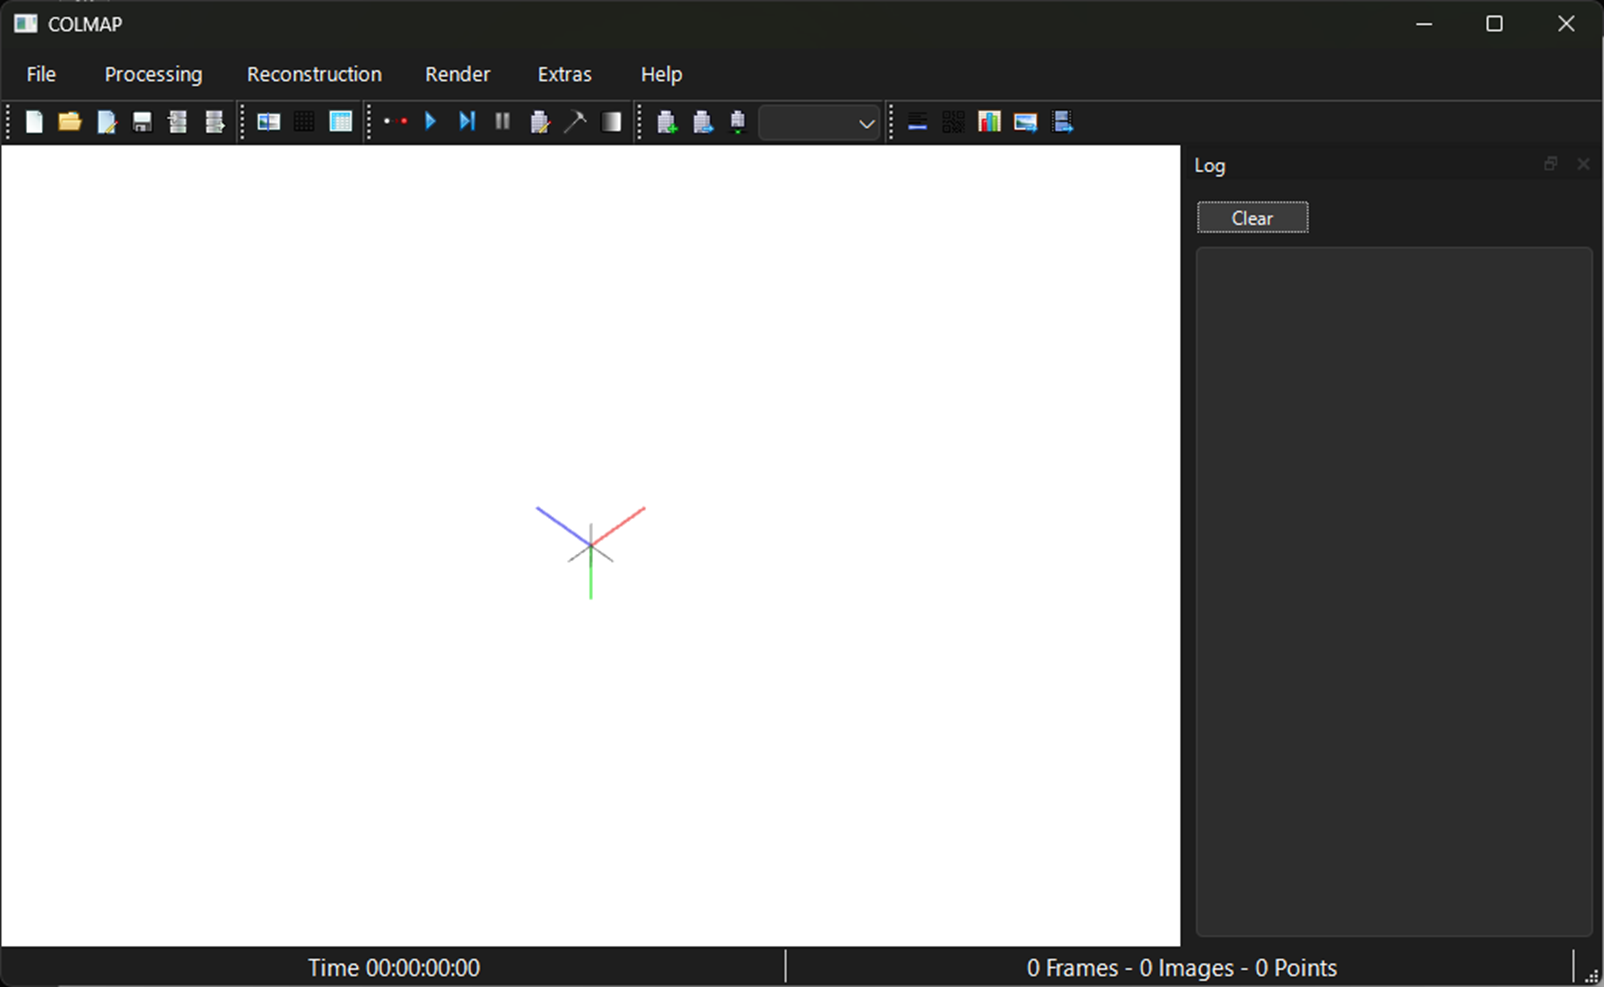
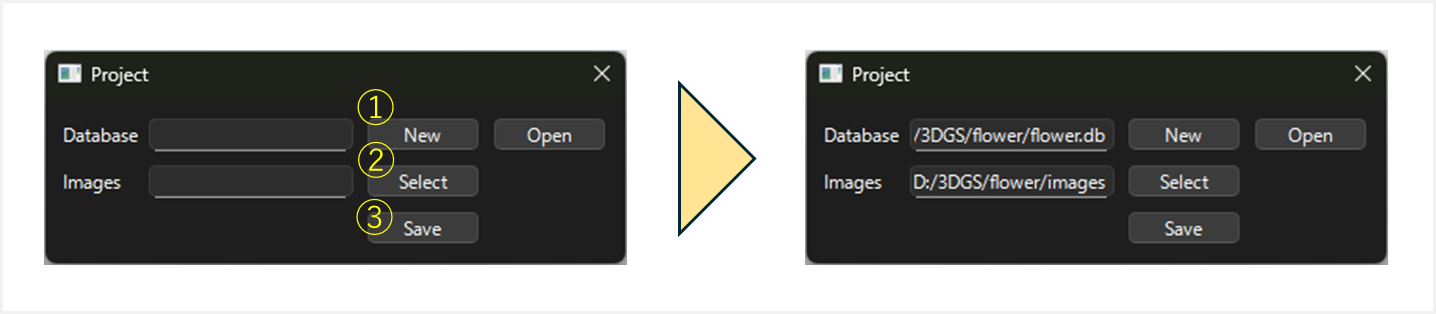
- From the top-left menu, select “File” → “New project” to create a new project.
- Set the database file path and the directory containing the input images, then save (execute steps ①–③ in order).
- From “Processing” → “Feature extraction”, configure items (①, ②) and then click “Extract” (③) to extract feature points (using default settings).
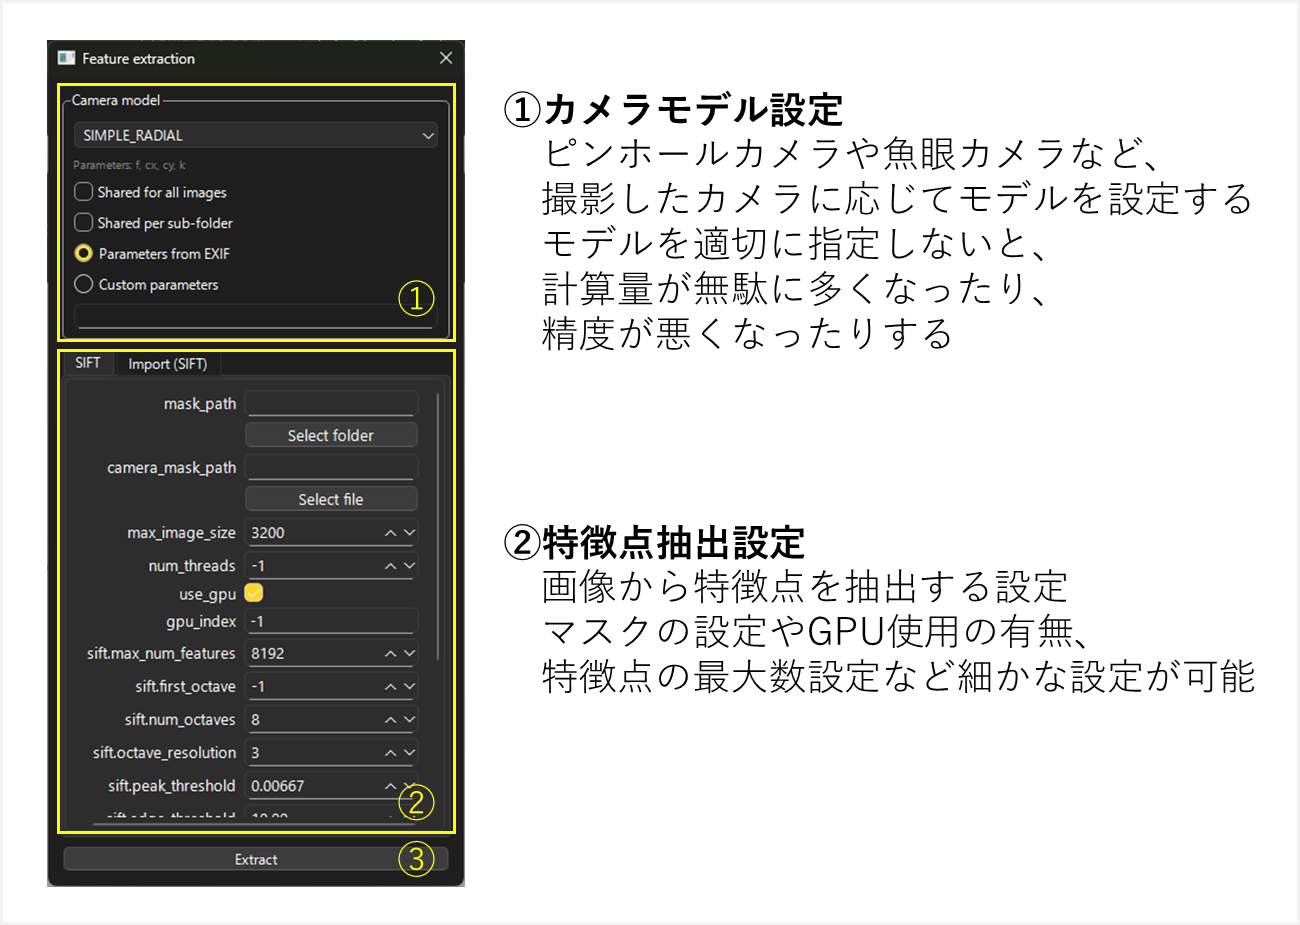
- Wait until the “Extracting…” dialog disappears.
- From “Processing” → “Feature matching”, configure settings and click “Run” (②) to match feature points between images (default settings).
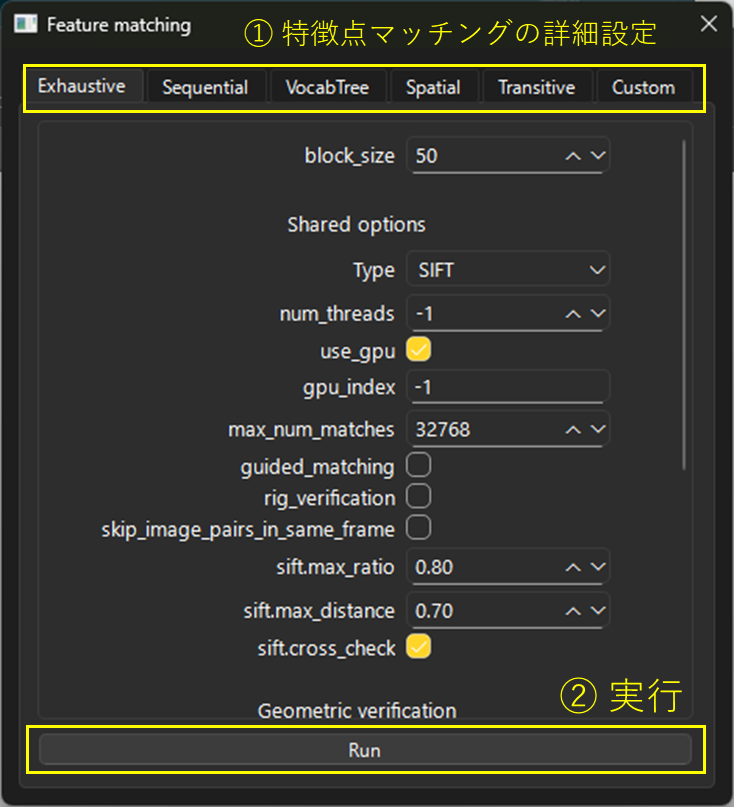
- Wait until the “Matching…” dialog disappears.
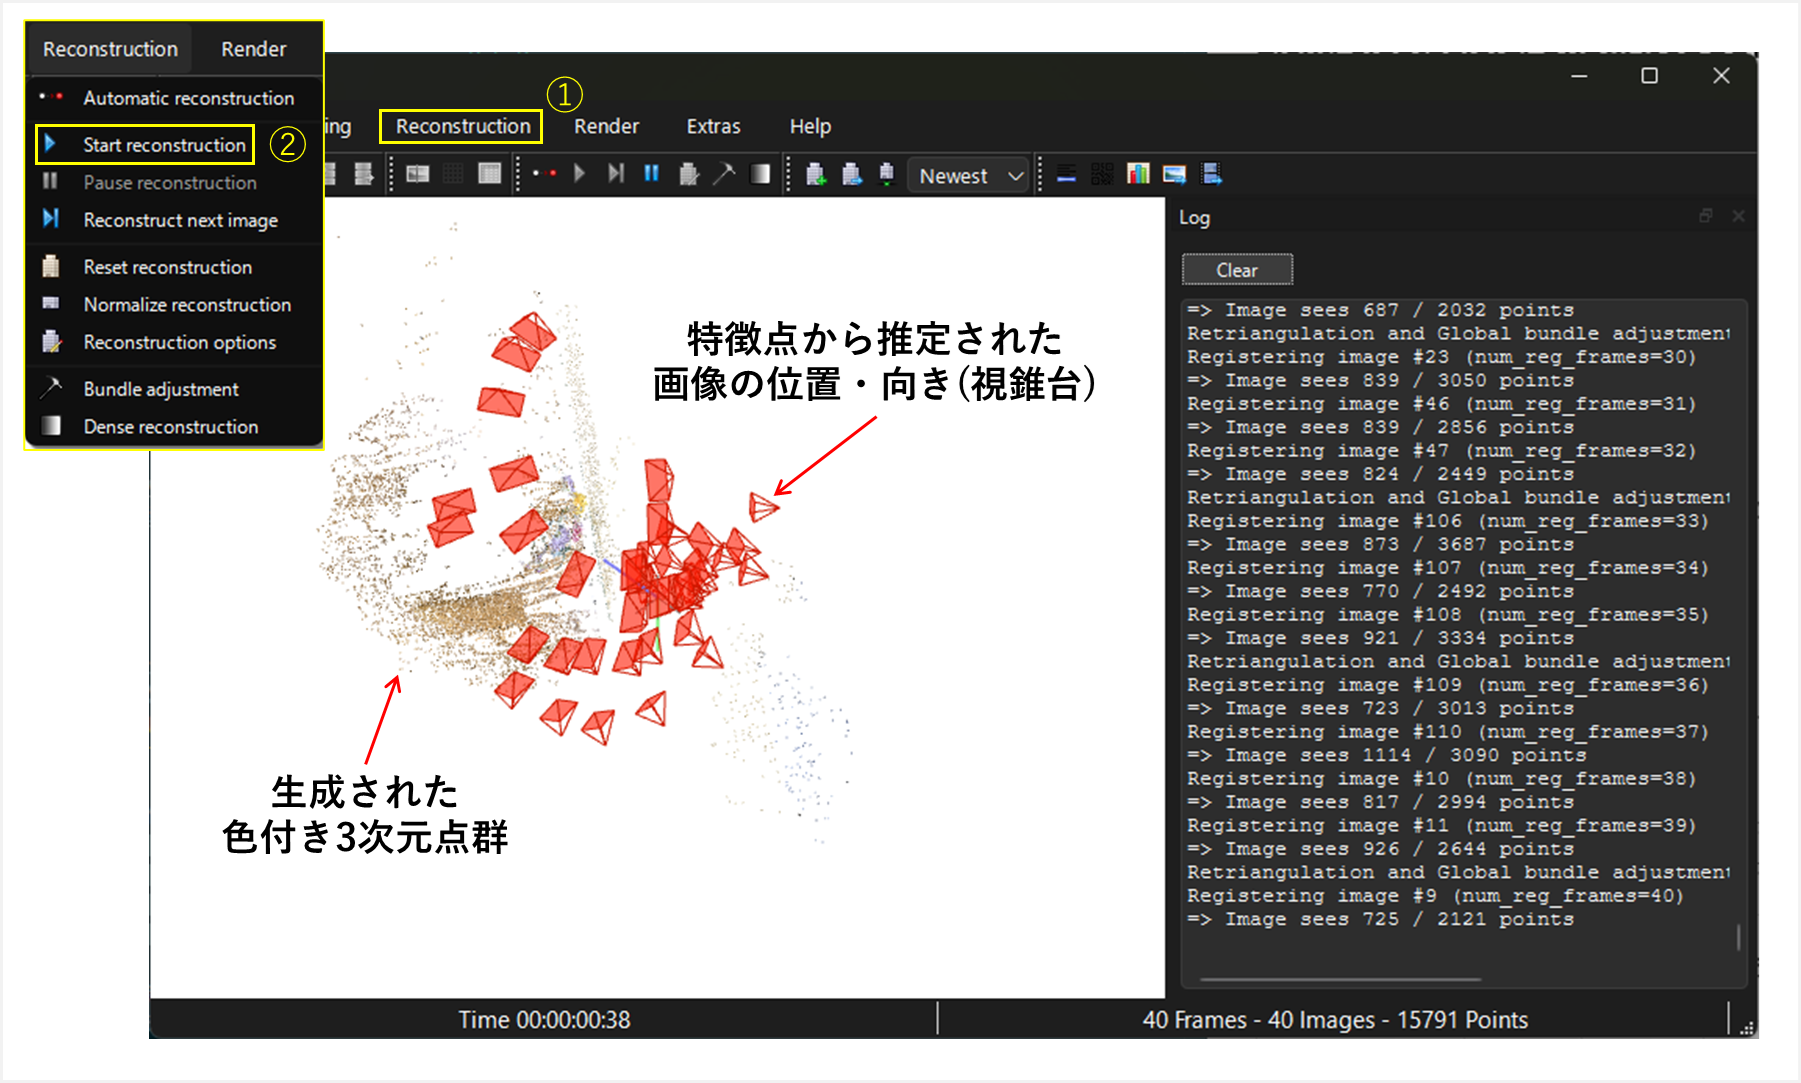
- From “Reconstruction” → “Start reconstruction”, generate a 3D point cloud with RGB information from the matching results.
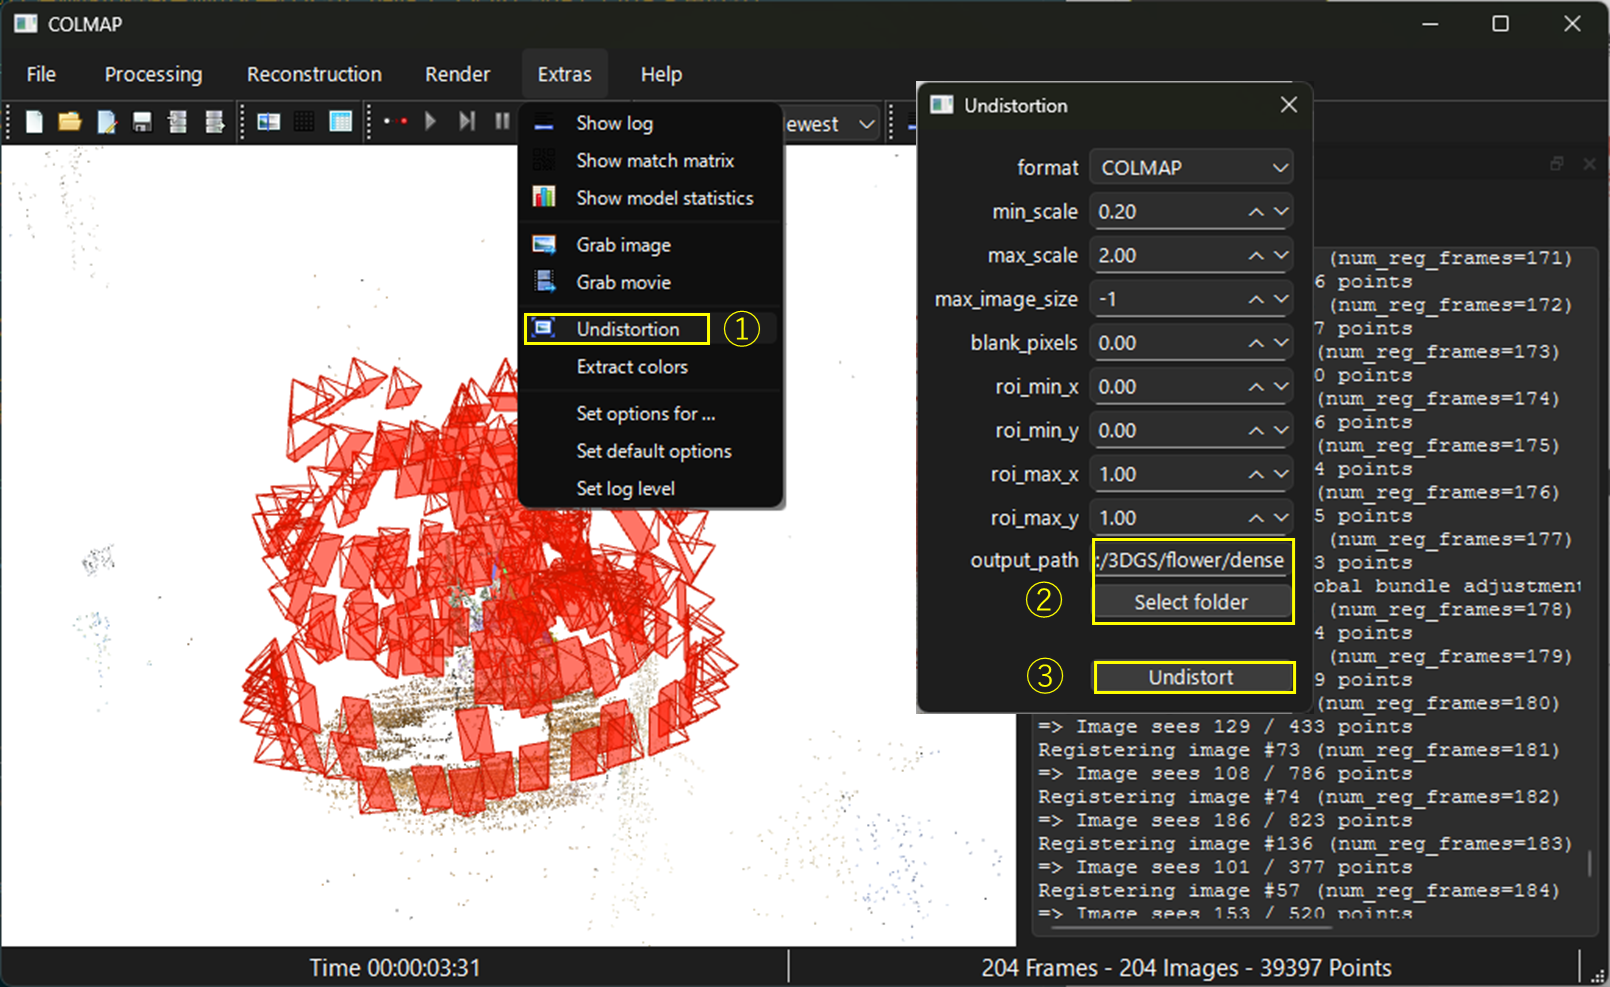
- From “Extras” → “Undistortion”, generate images corrected for lens distortion.
- Use “Select folder” to create and specify an output folder.
- Here, create a folder named “dense” at the same level as the input images.
- Wait until the “Undistorting…” dialog disappears.
- If output images appear in the specified folder, the process is complete.
3. Creating the 3DGS
#Now comes the main step. We will create the 3DGS using the point cloud from COLMAP and the distortion-corrected images, with the open-source LichtFeldStudio. As with COLMAP, there are many parameters, but we will stick mostly to the defaults.
-
Download the latest version of LichtFeldStudio and extract it (current version: 0.41).
-
In the extracted folder, click “bin → LichtFeld-Studio.exe” to launch the GUI.
- You can change the language (e.g., to Japanese) from the dropdown in the center.
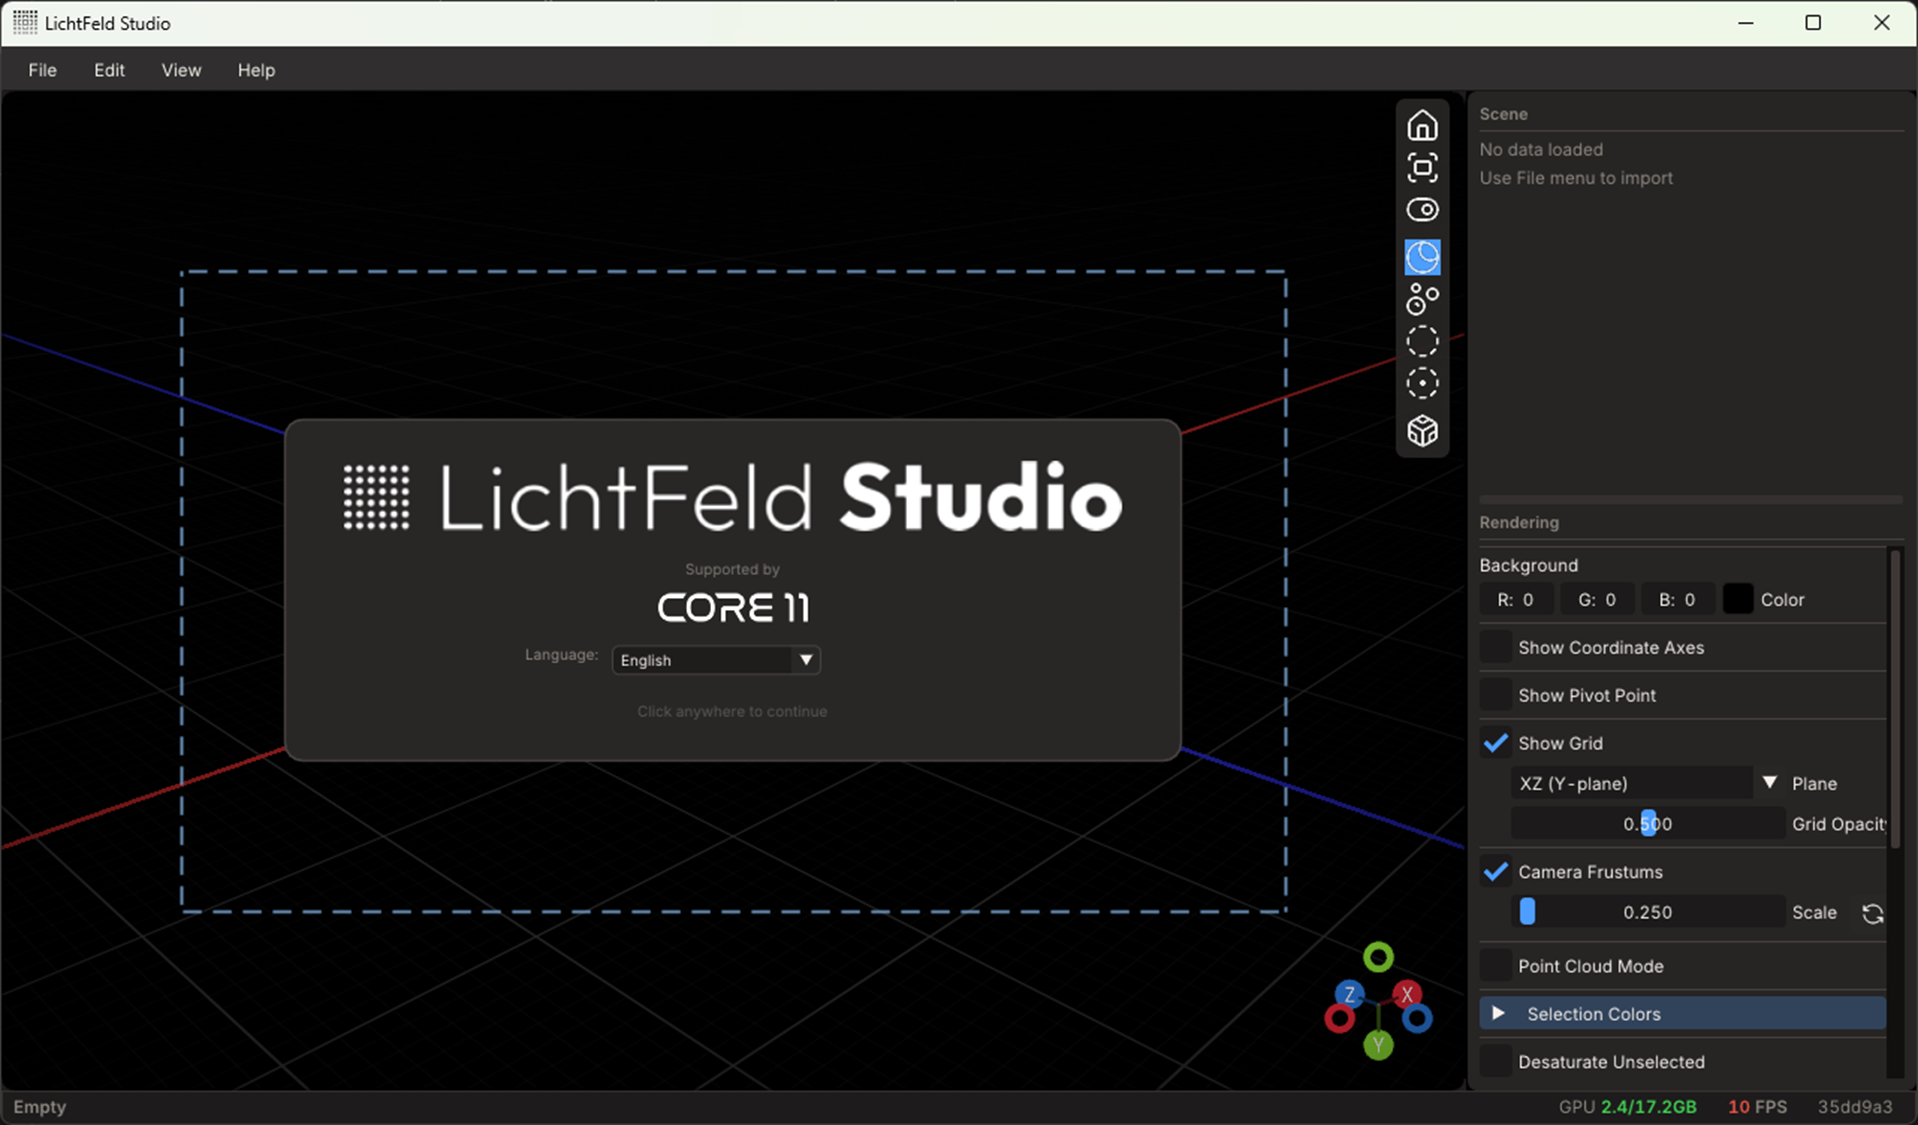
- You can change the language (e.g., to Japanese) from the dropdown in the center.
-
Click anywhere in the application window to switch screens as shown below.
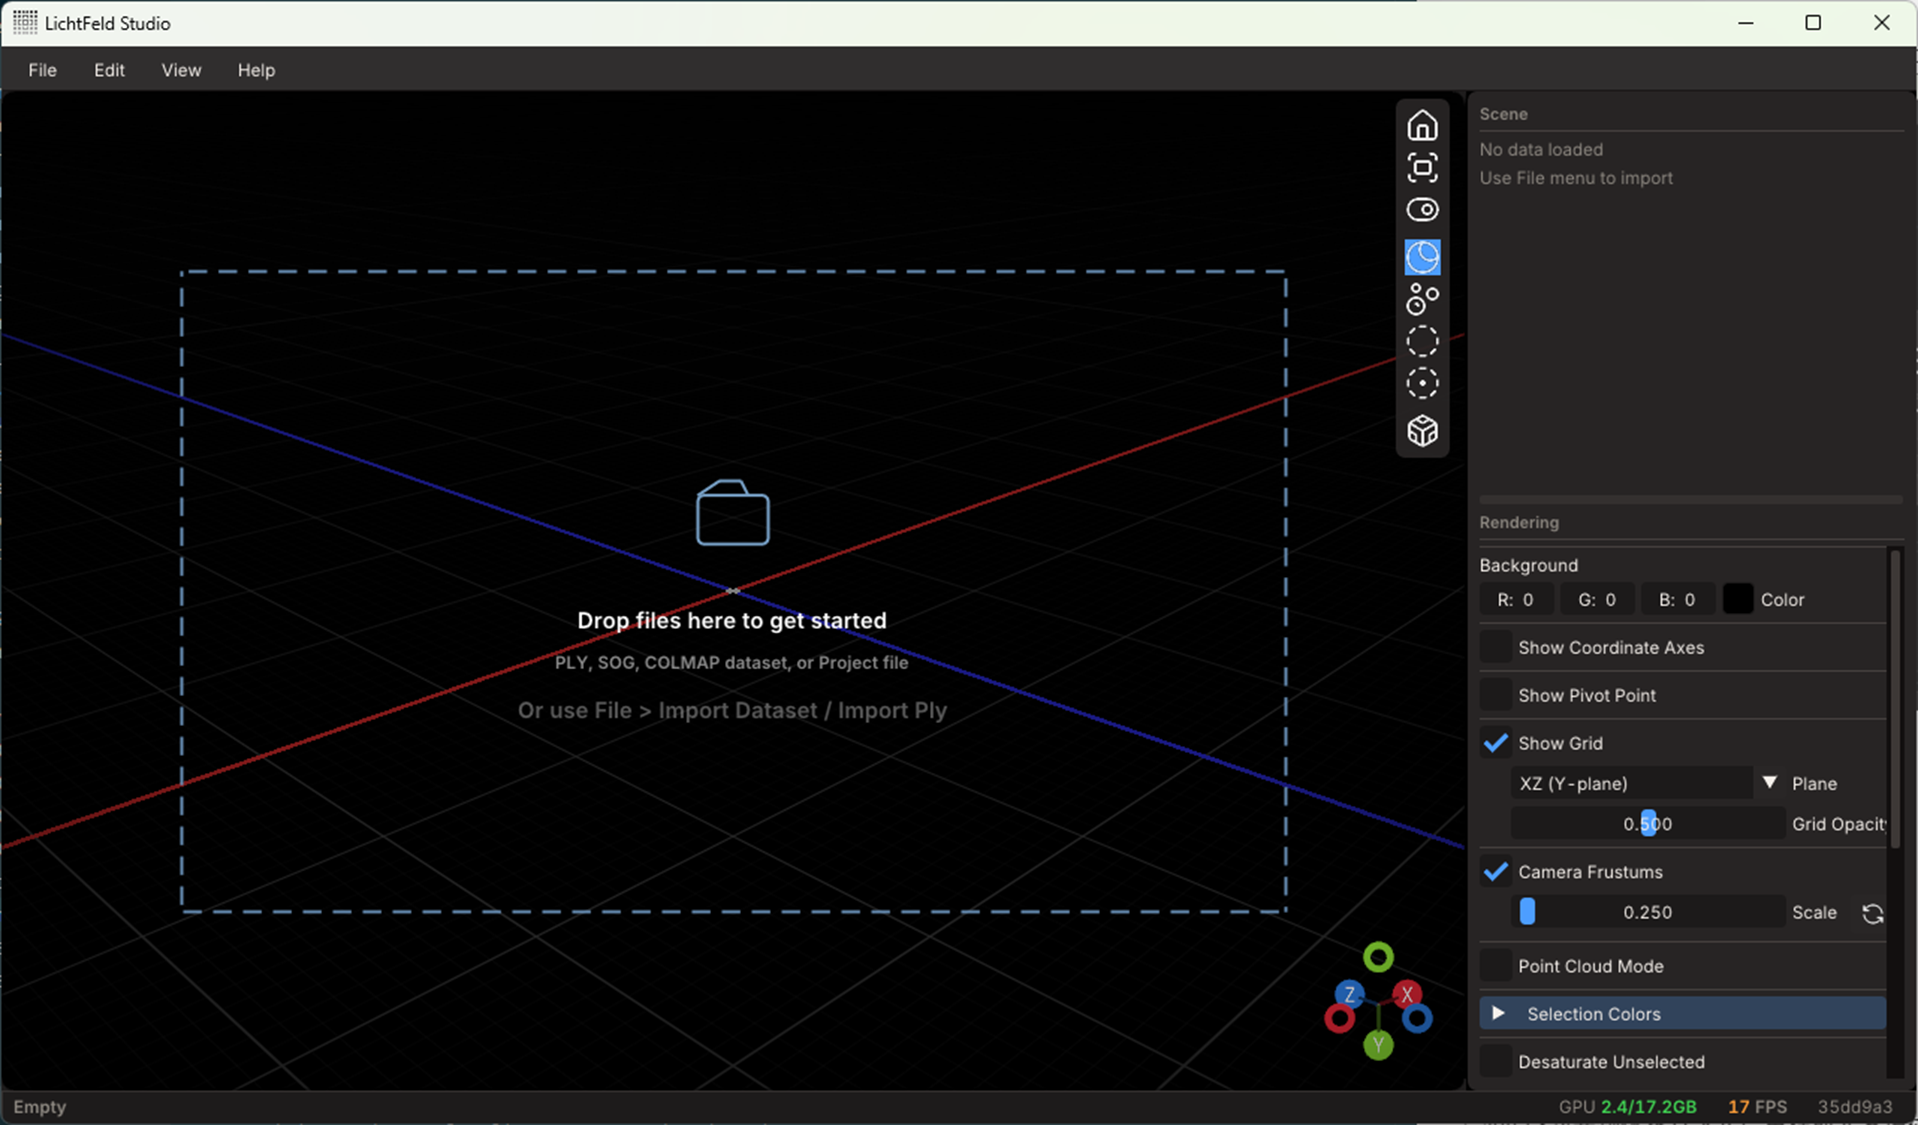
-
Drag & drop the COLMAP “dense” folder into the application. Confirm the Output location and click “Load.”
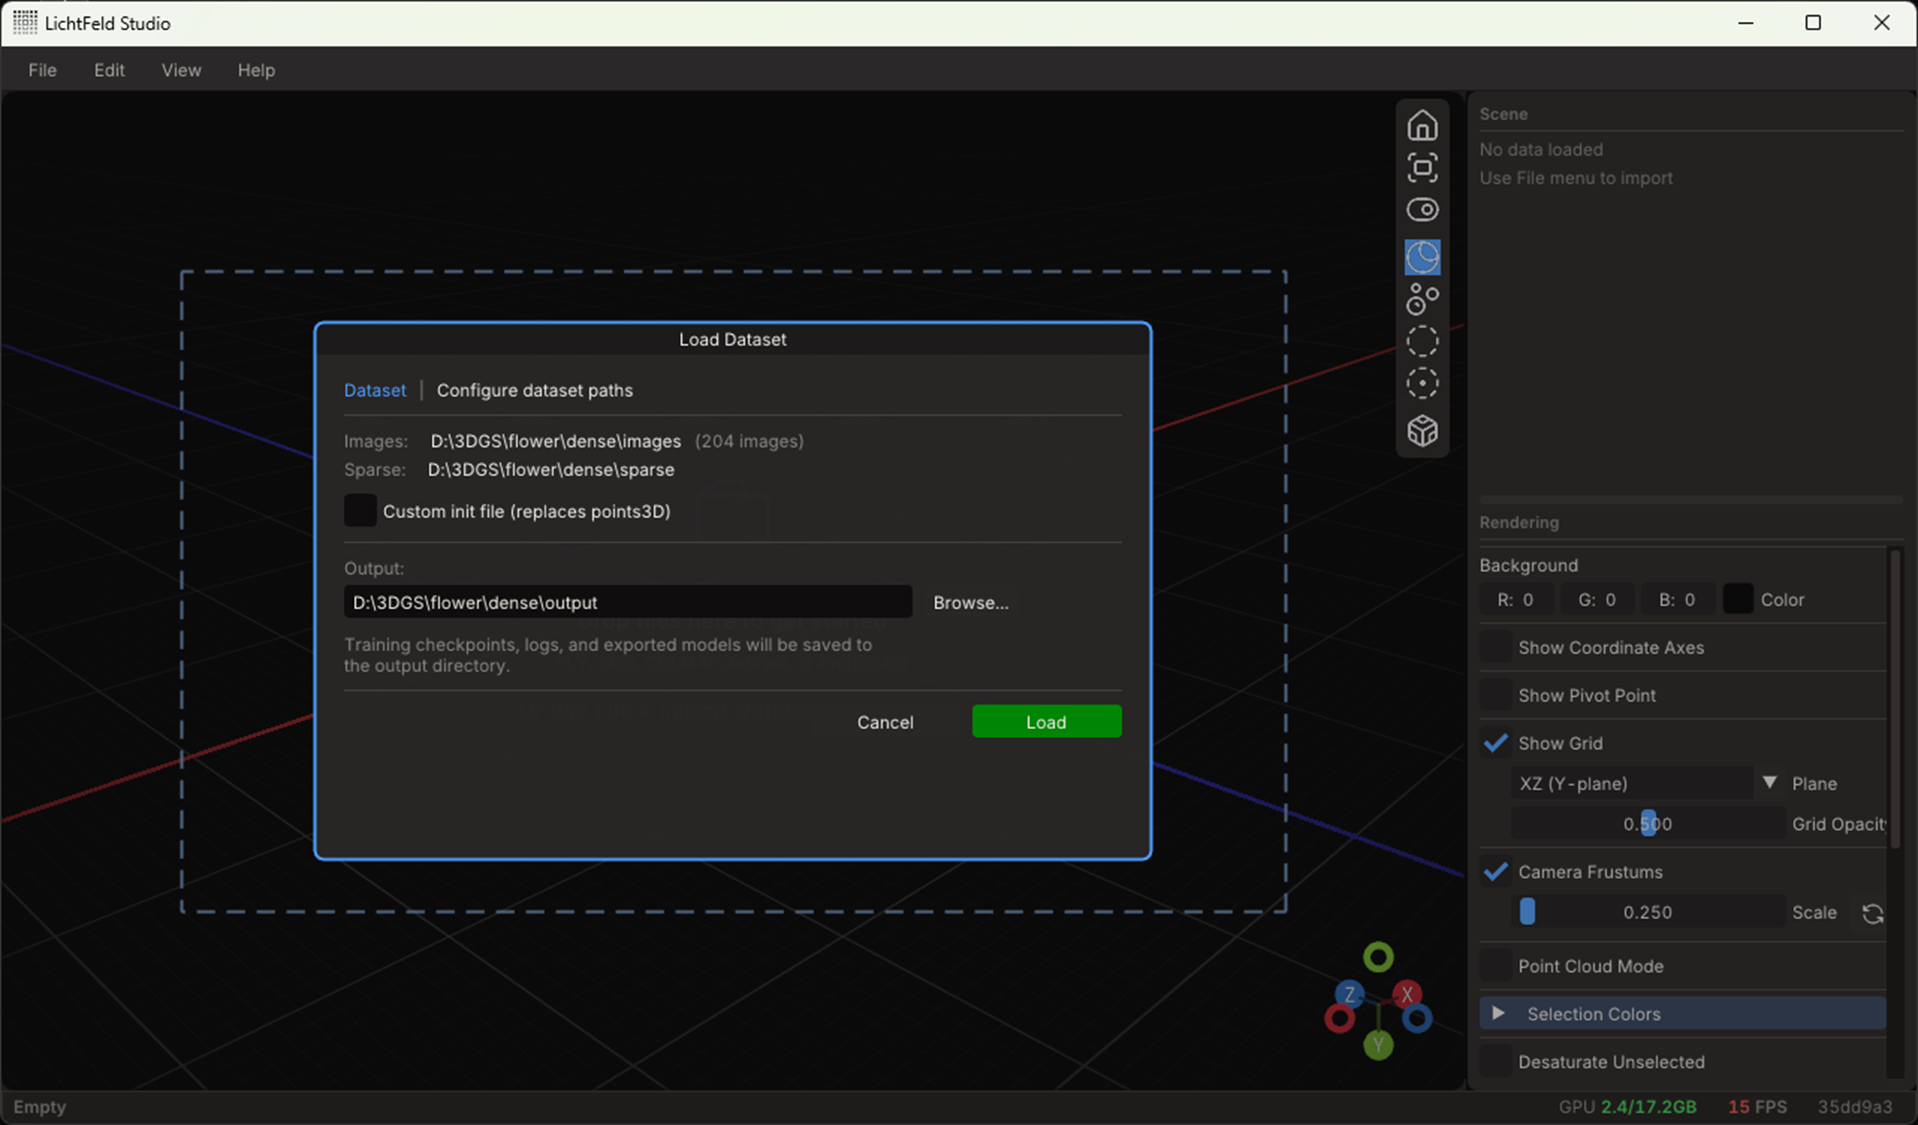
-
The 3D point cloud from COLMAP and the view frustums showing image positions and orientations will appear.
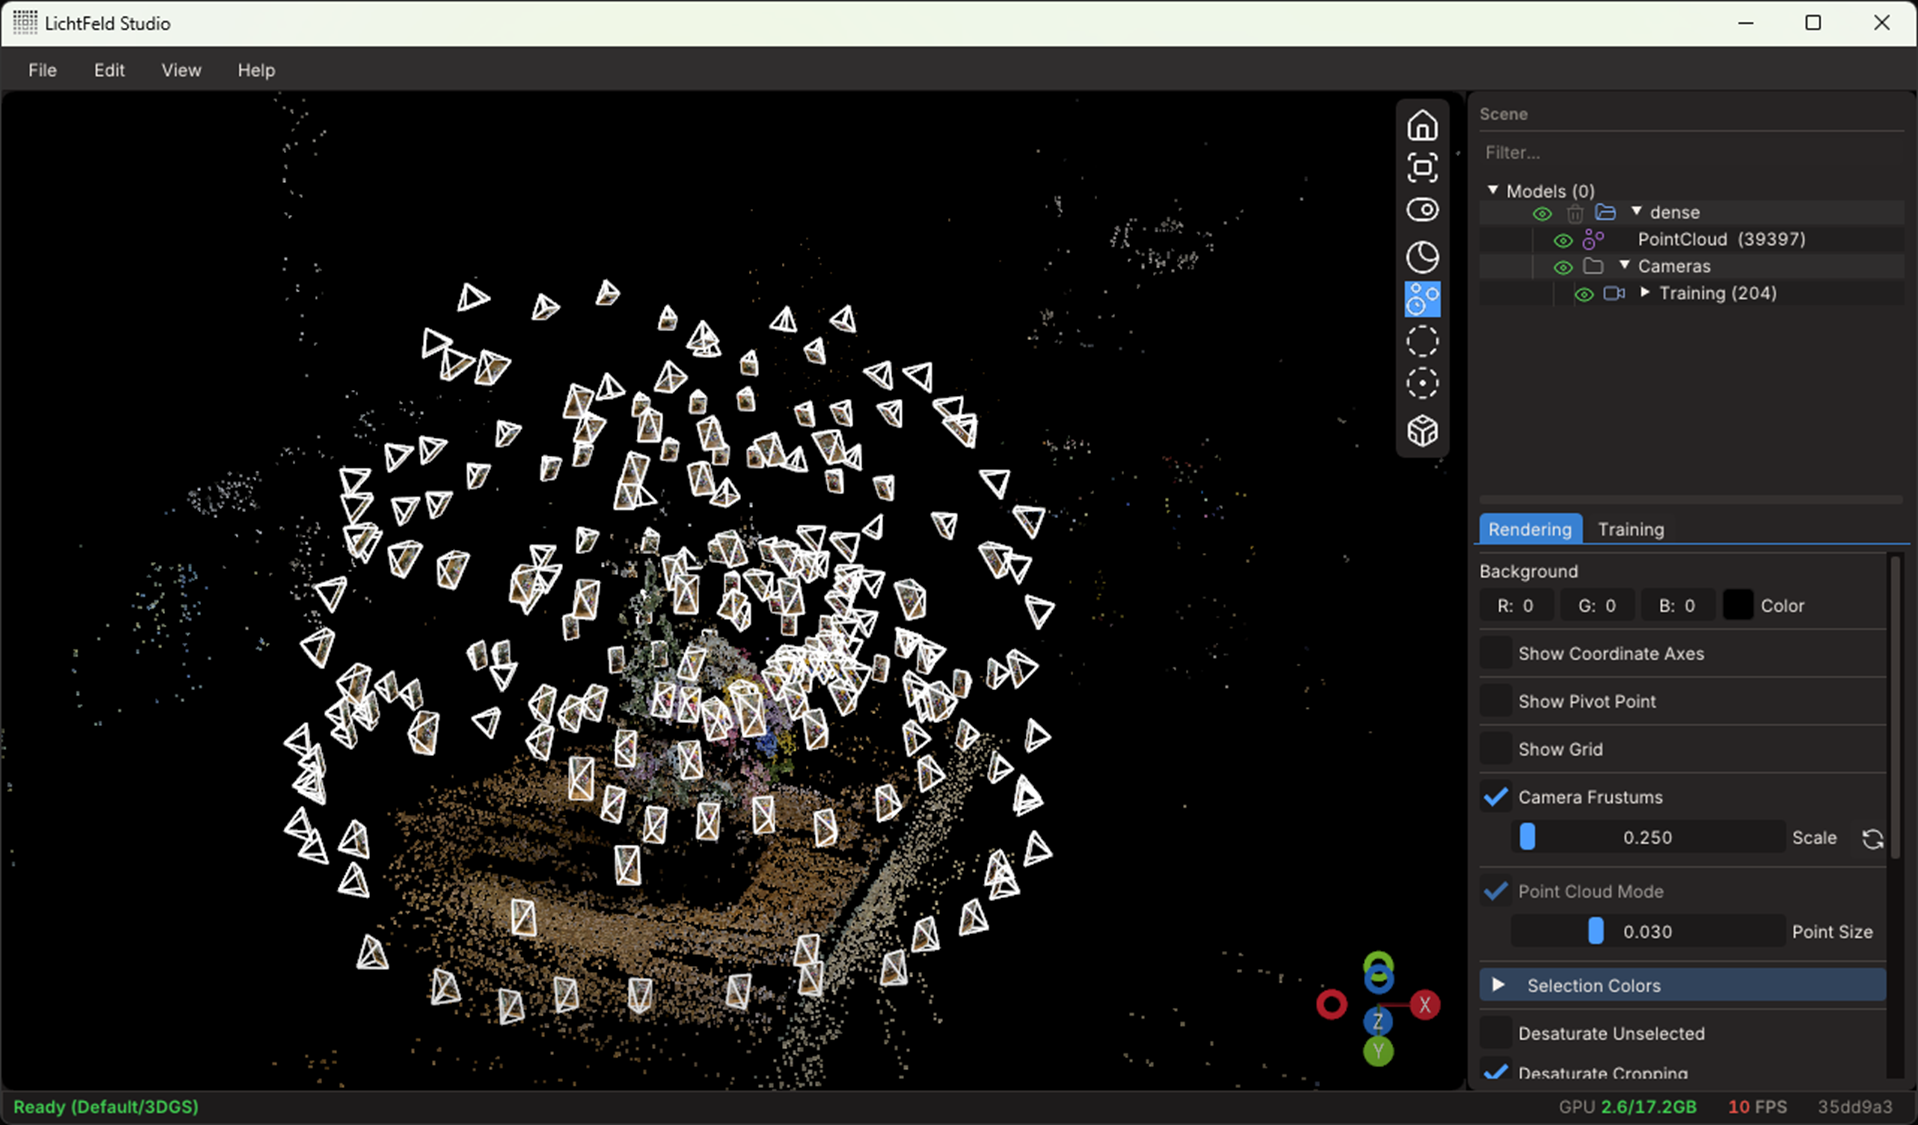
-
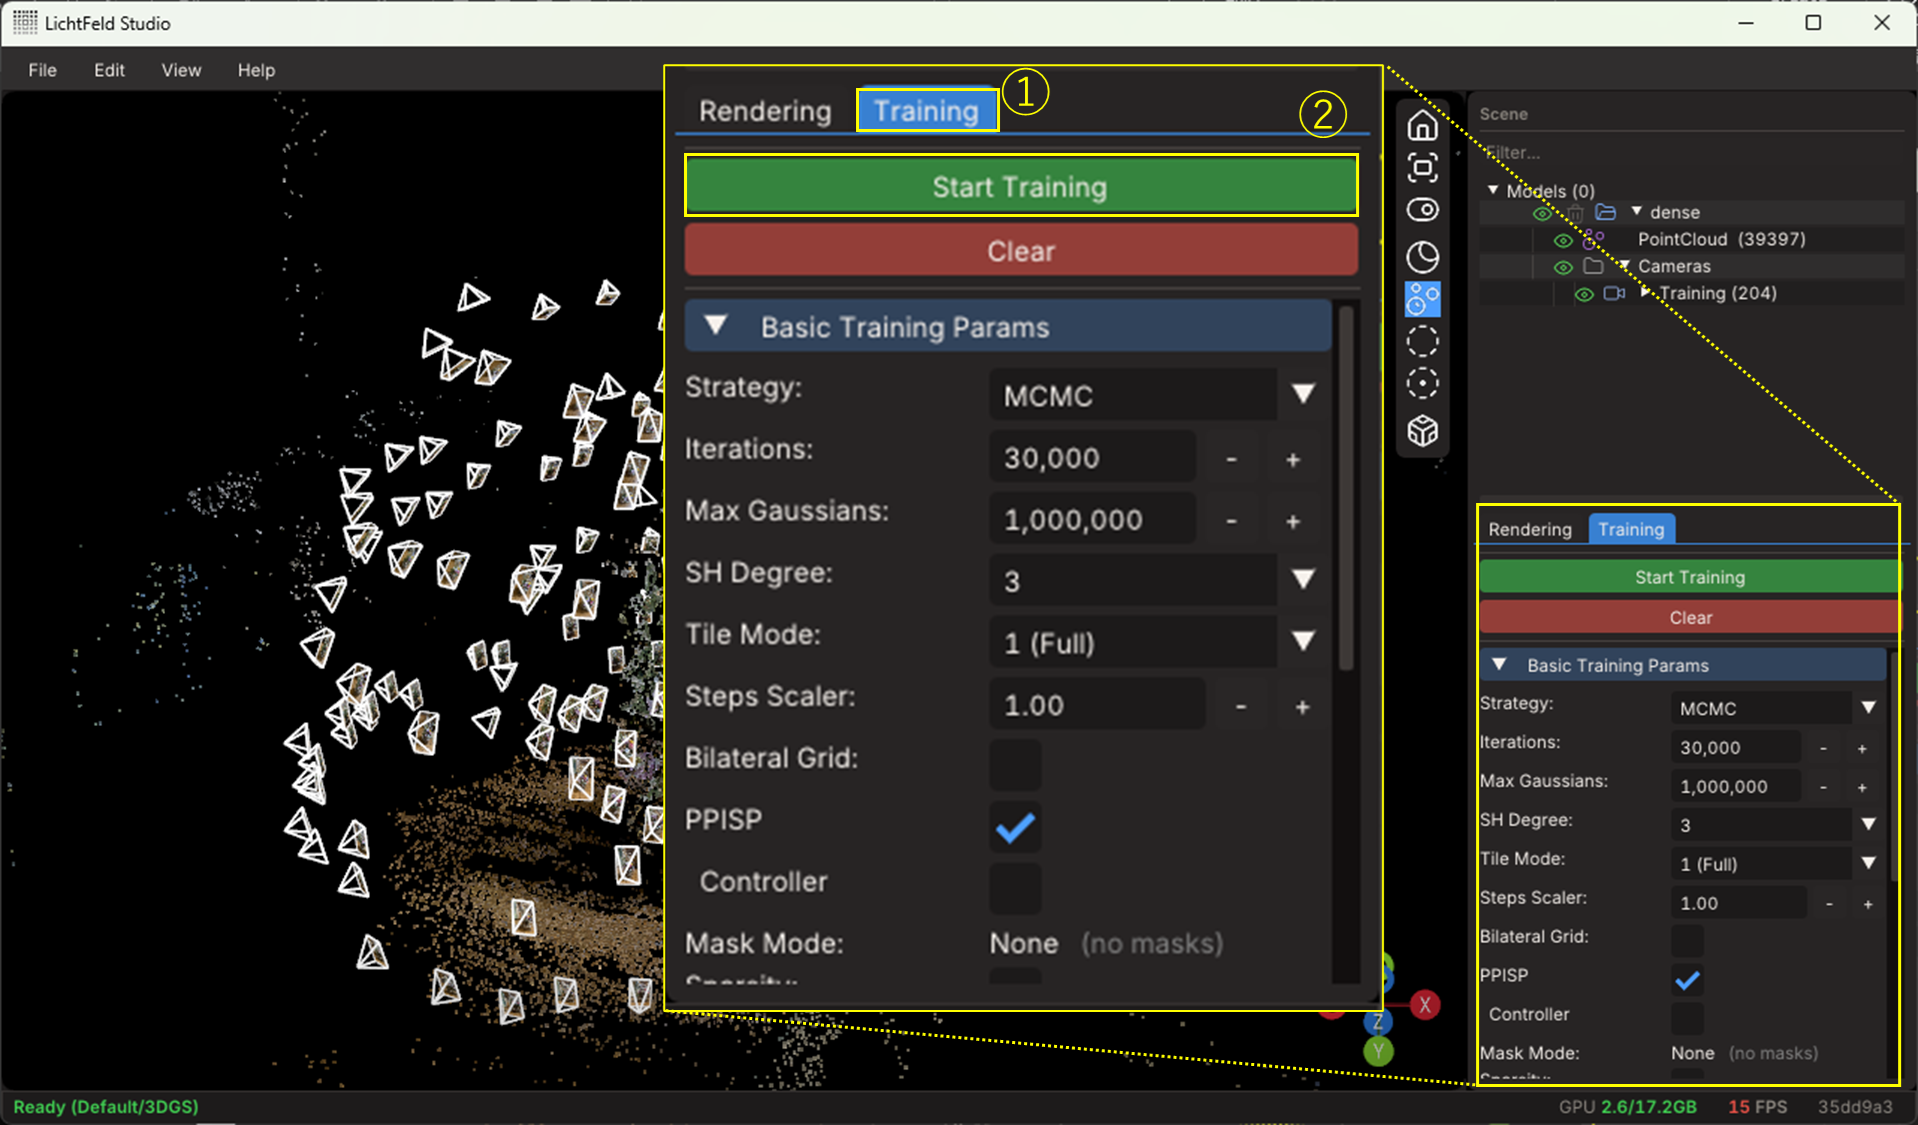
Click the “Training” tab on the right, review the settings, then click “Start Training.”
Main parameters:- Iterations: Number of calculation iterations
- Max Gaussians: Maximum number of 3D Gaussian distributions
- SH Degree: Degree of the spherical harmonics function (lower reduces parameters)
Higher values generally yield higher quality but increase computation, so you may need to experiment.
The training process:
- Using the COLMAP point cloud as the initial state, the number of points (centers of the 3D Gaussians) is increased and moved (10× speed, point-cloud mode)
- Generating 3D Gaussian distributions around each point and adjusting their parameters (10× speed)
-
Wait for the “Training Complete” dialog.
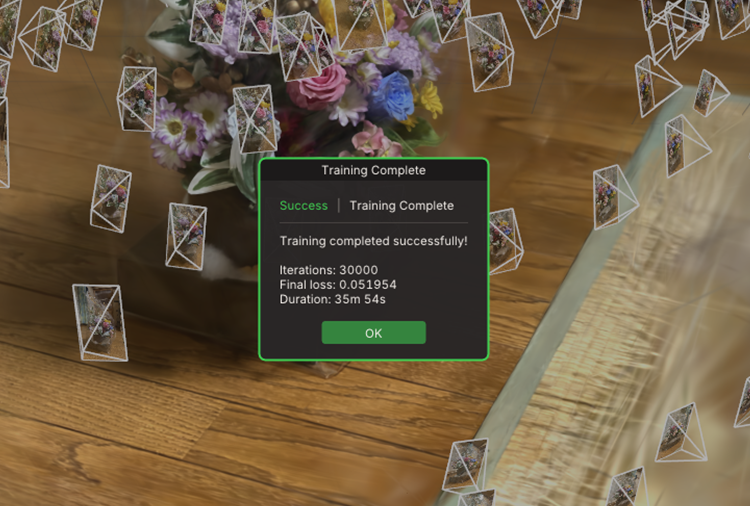
-
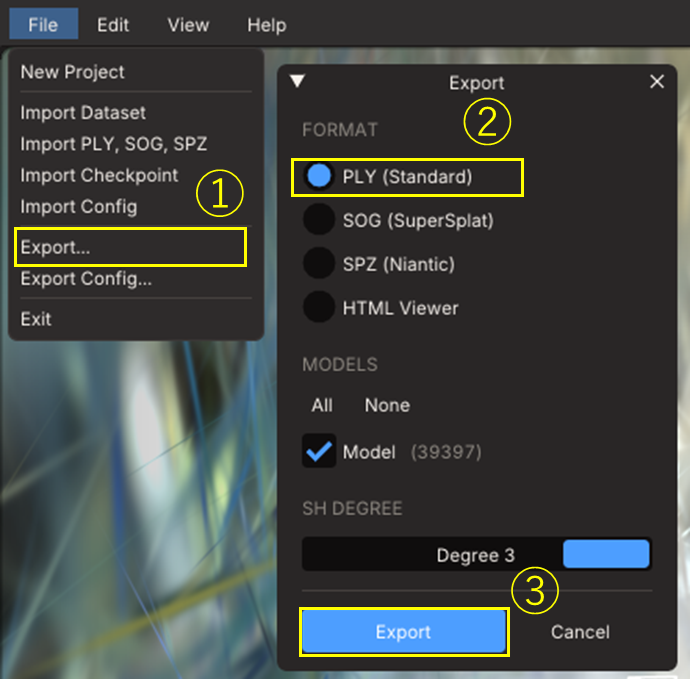
Select “File” → “Export...” to save the created 3DGS file.
4. Editing
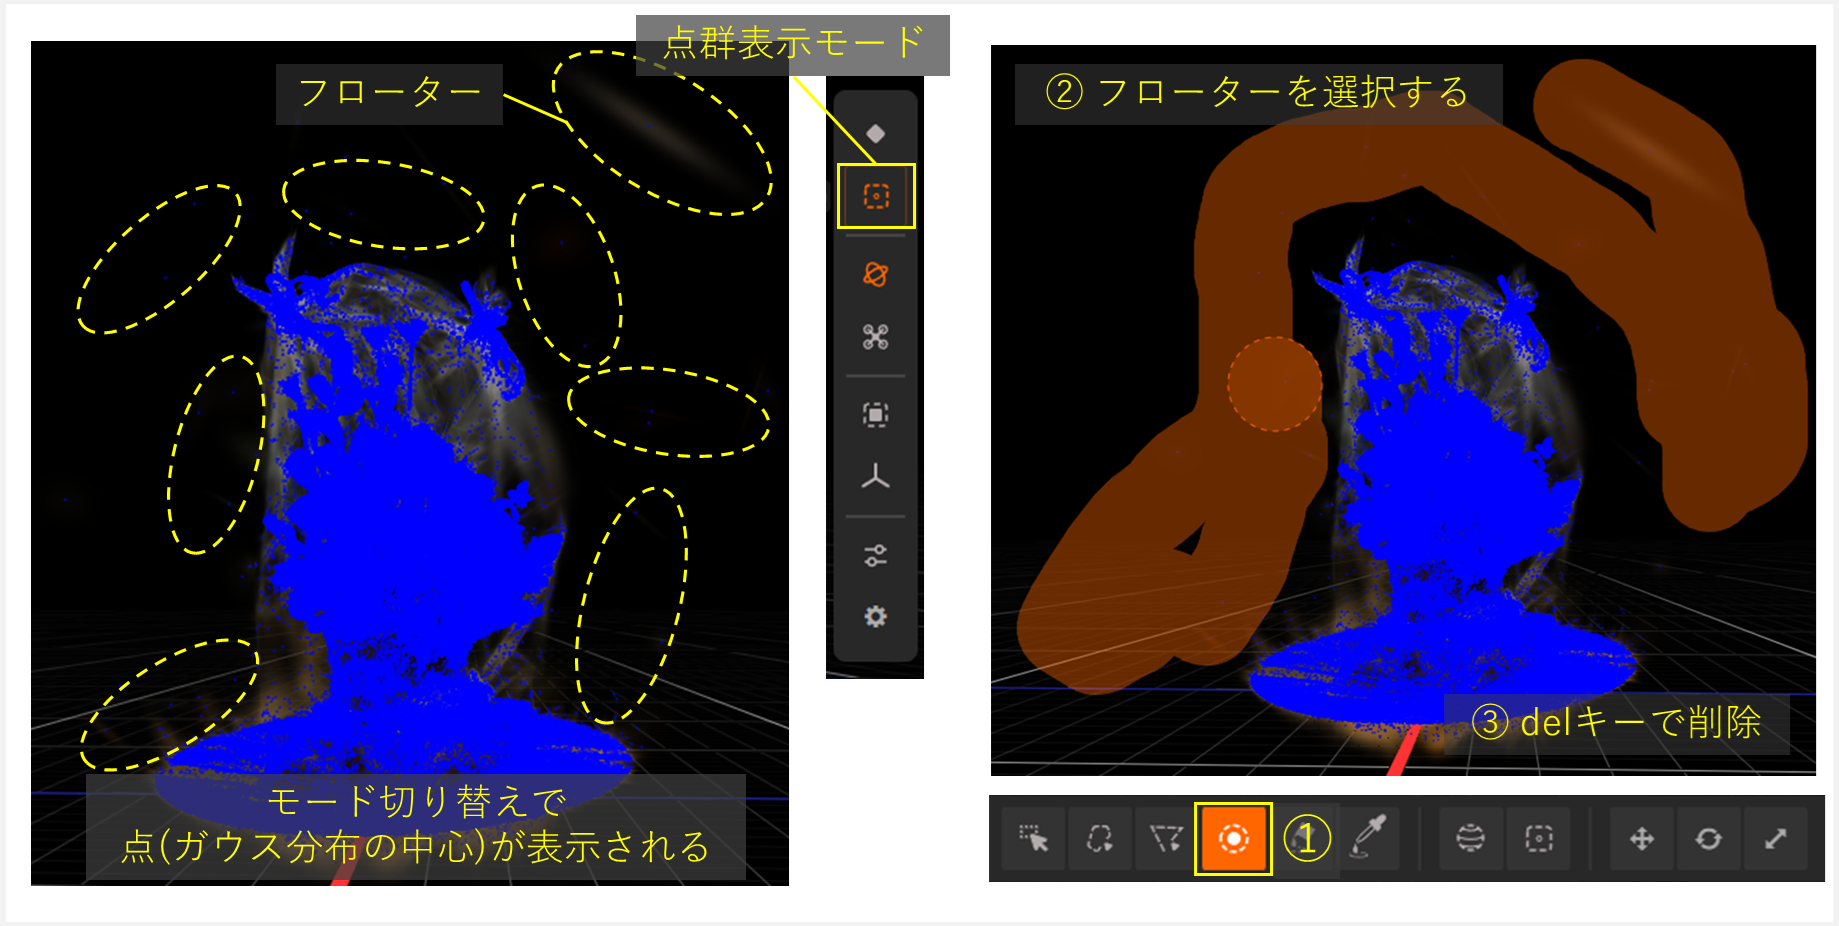
#This phase is about polishing the created 3DGS. If you judge the quality sufficient, you can skip it. Generally, though, backgrounds may be low-resolution and unintended haze‐like floaters often appear around the subject. Removing these improves appearance, rendering speed, and file size. We use SuperSplat for 3DGS editing.
- Go to SuperSplat.
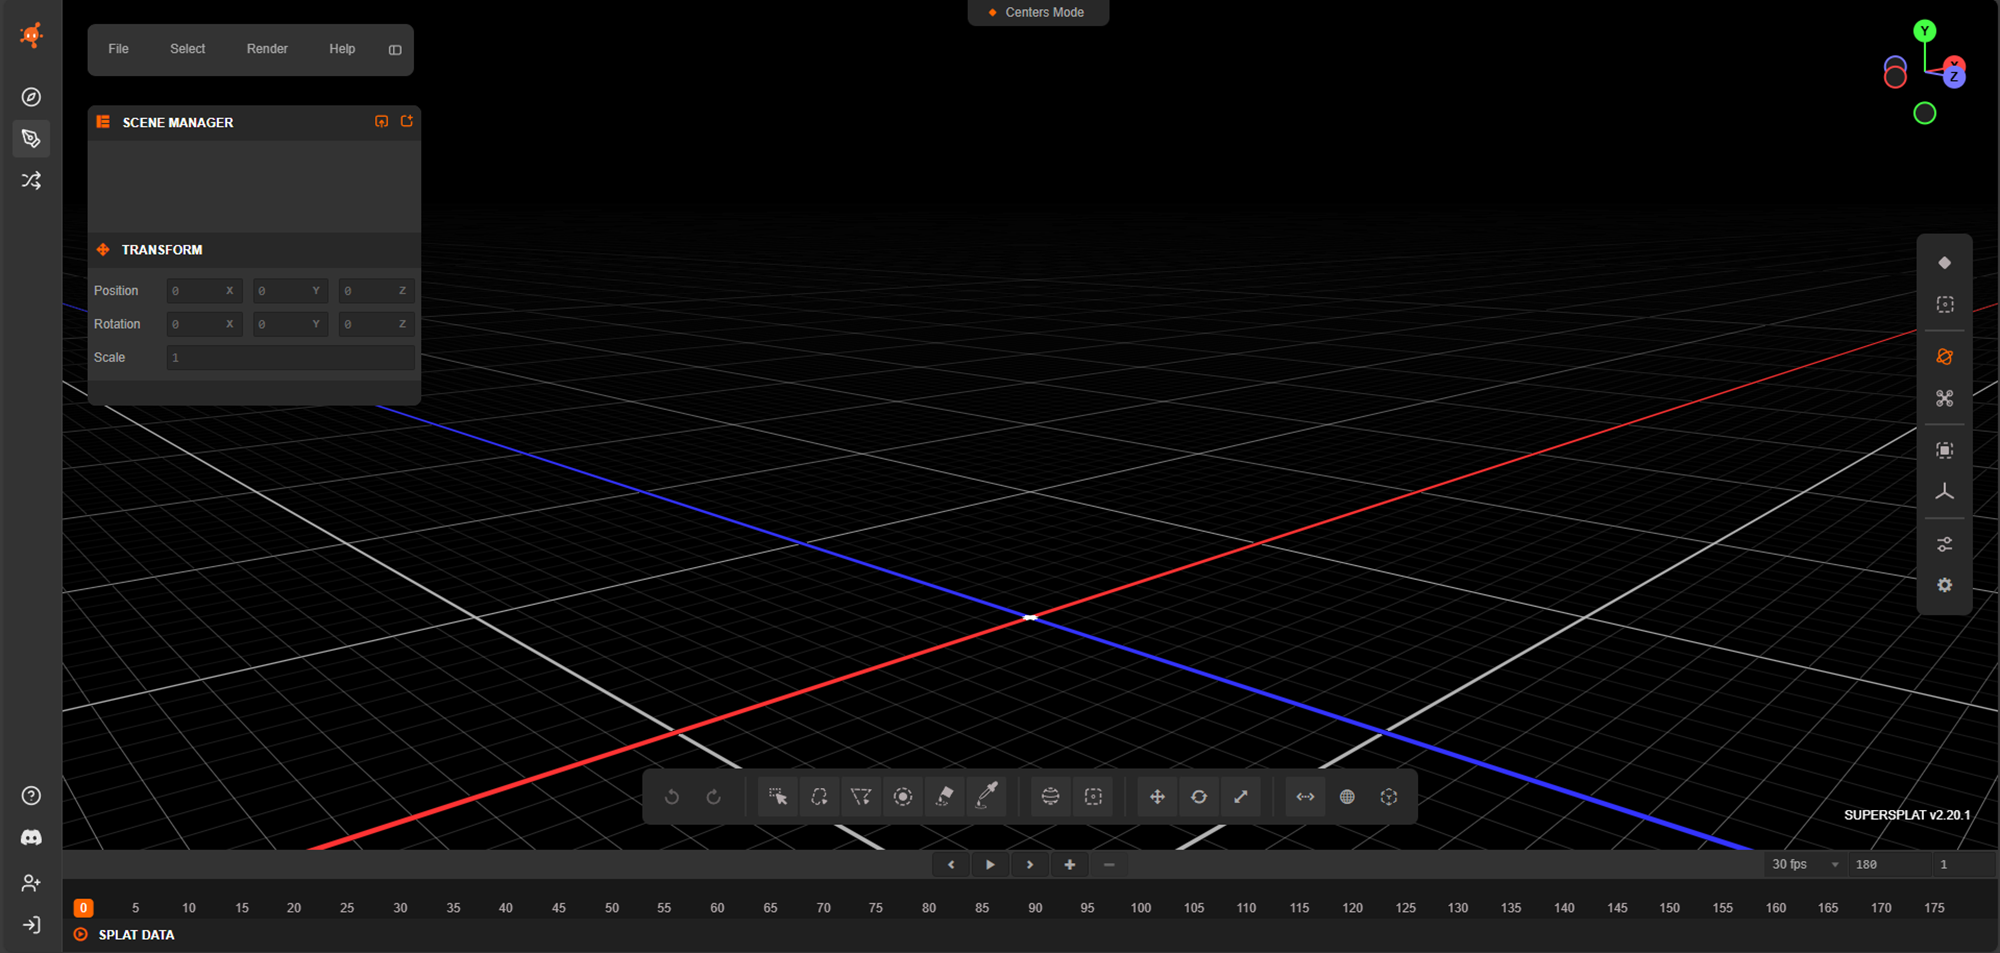
- Drag & drop your 3DGS file onto the SuperSplat browser window to import it.
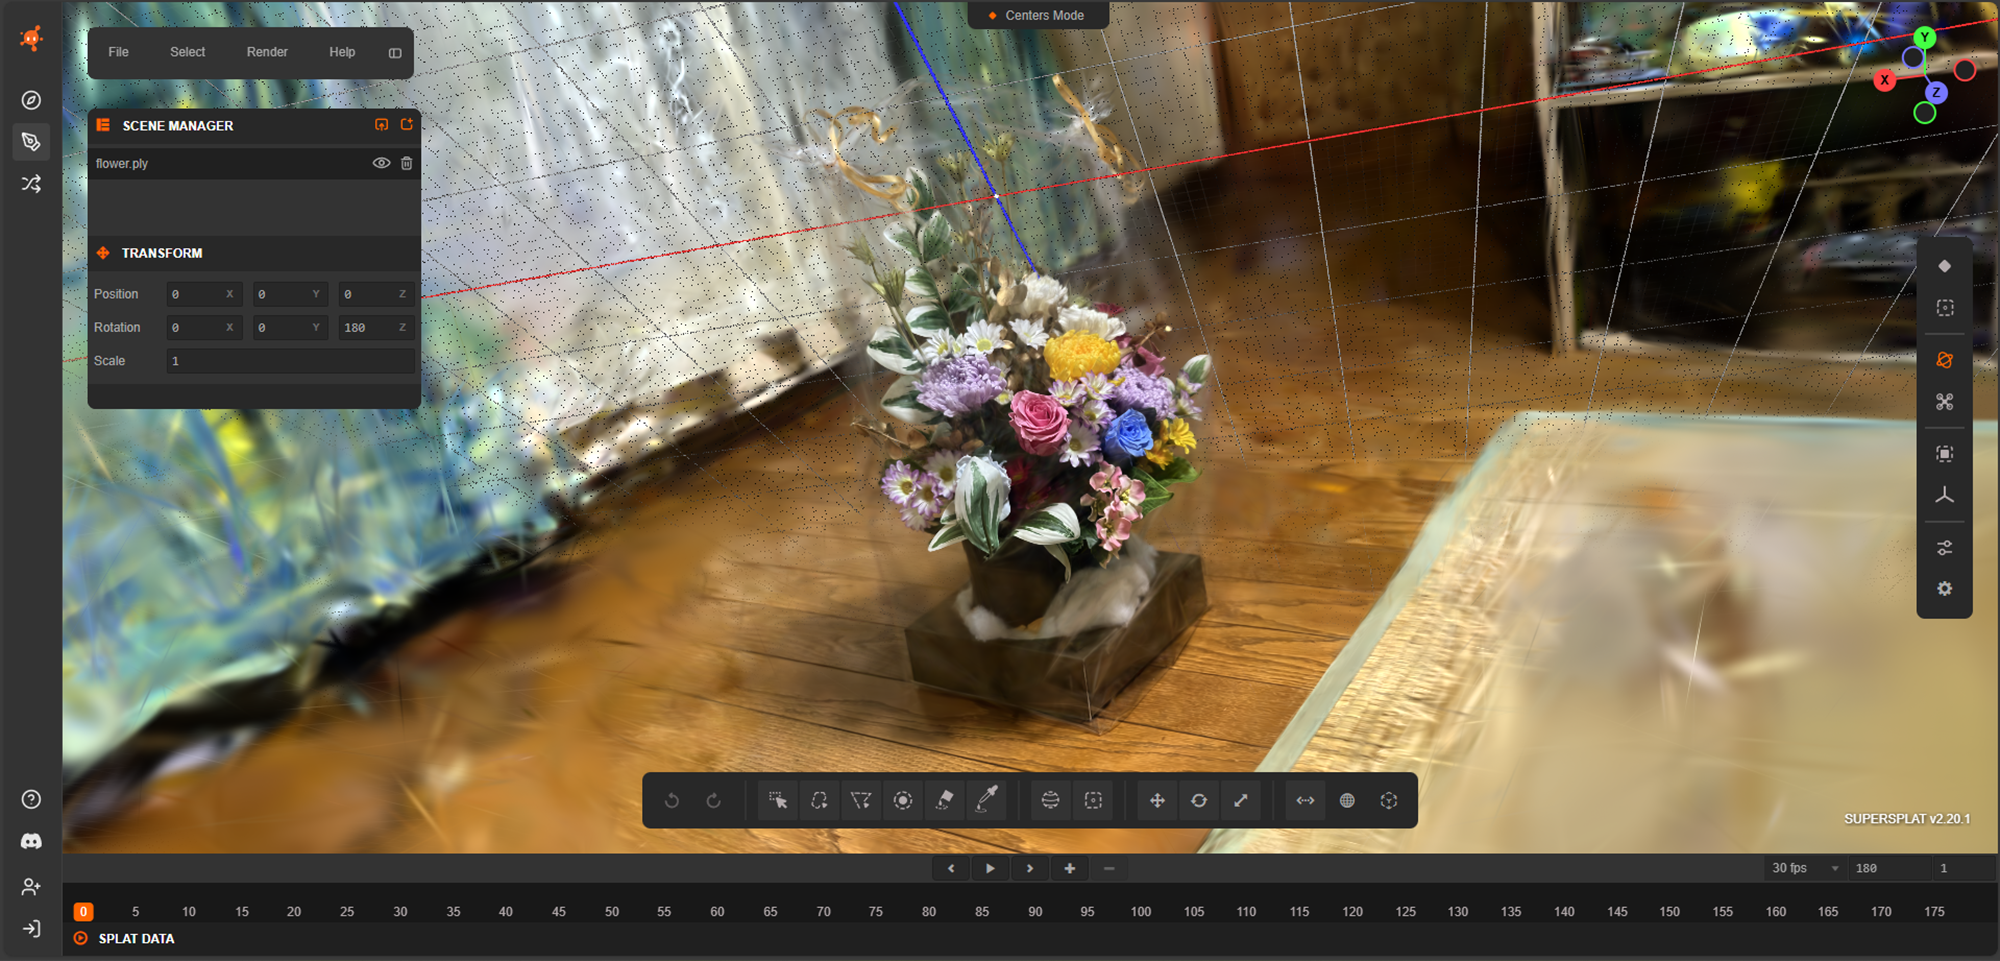
- Edit the imported 3DGS:
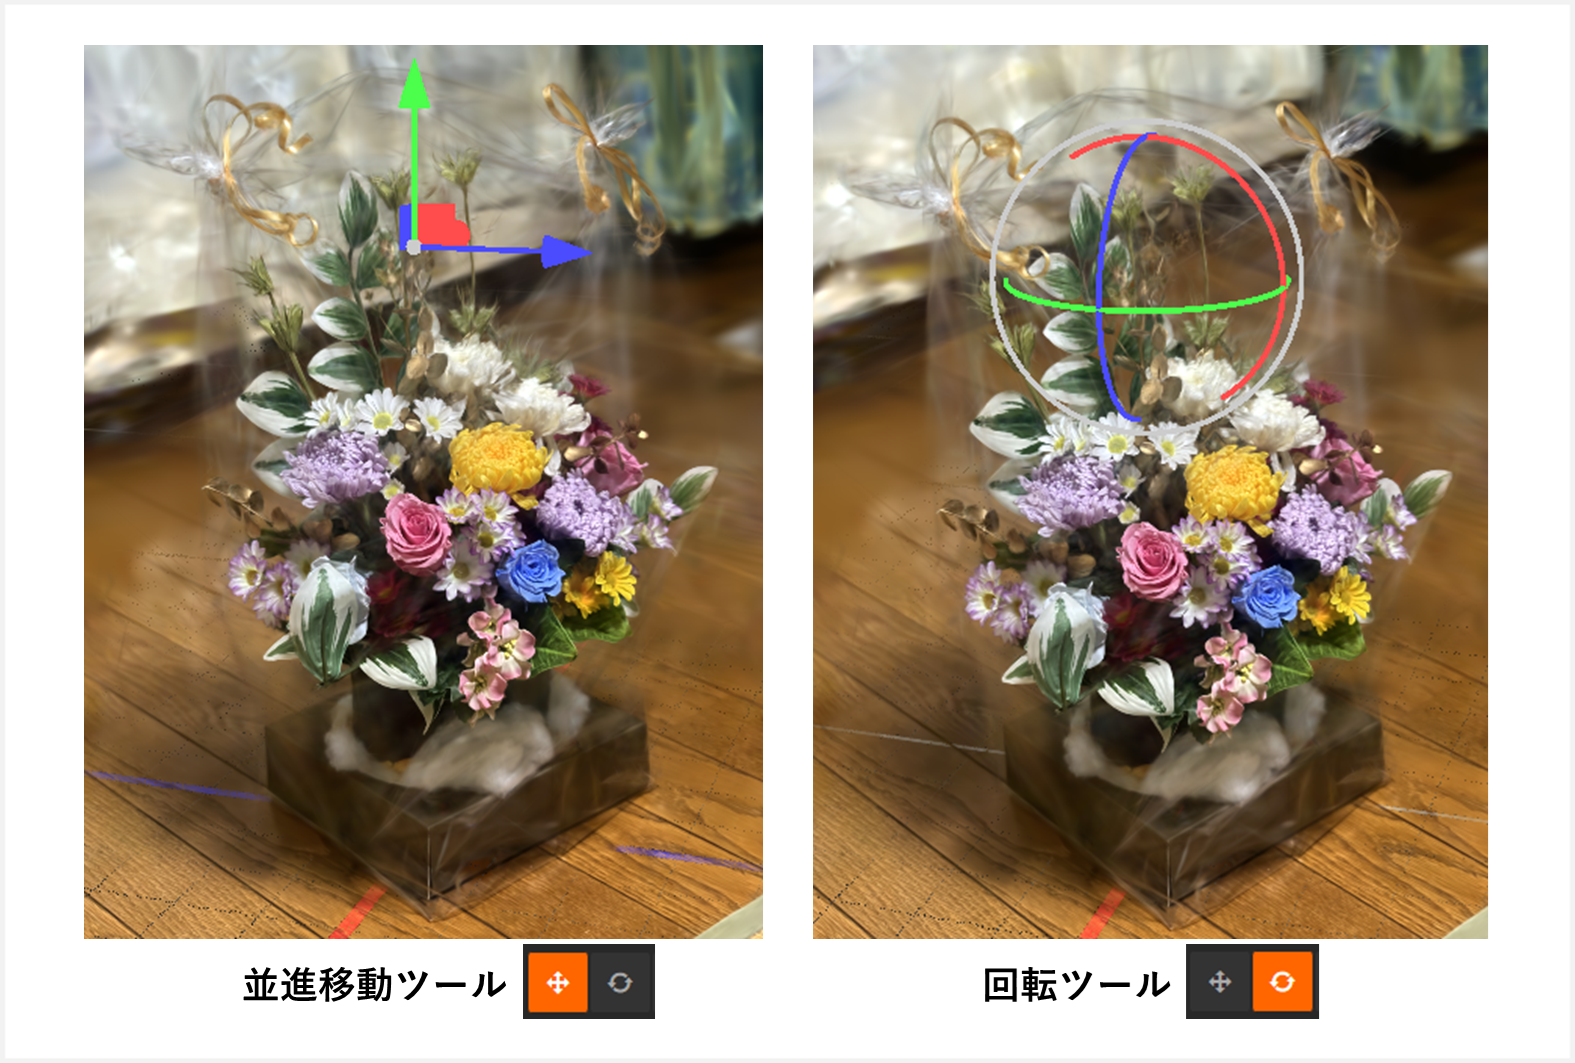
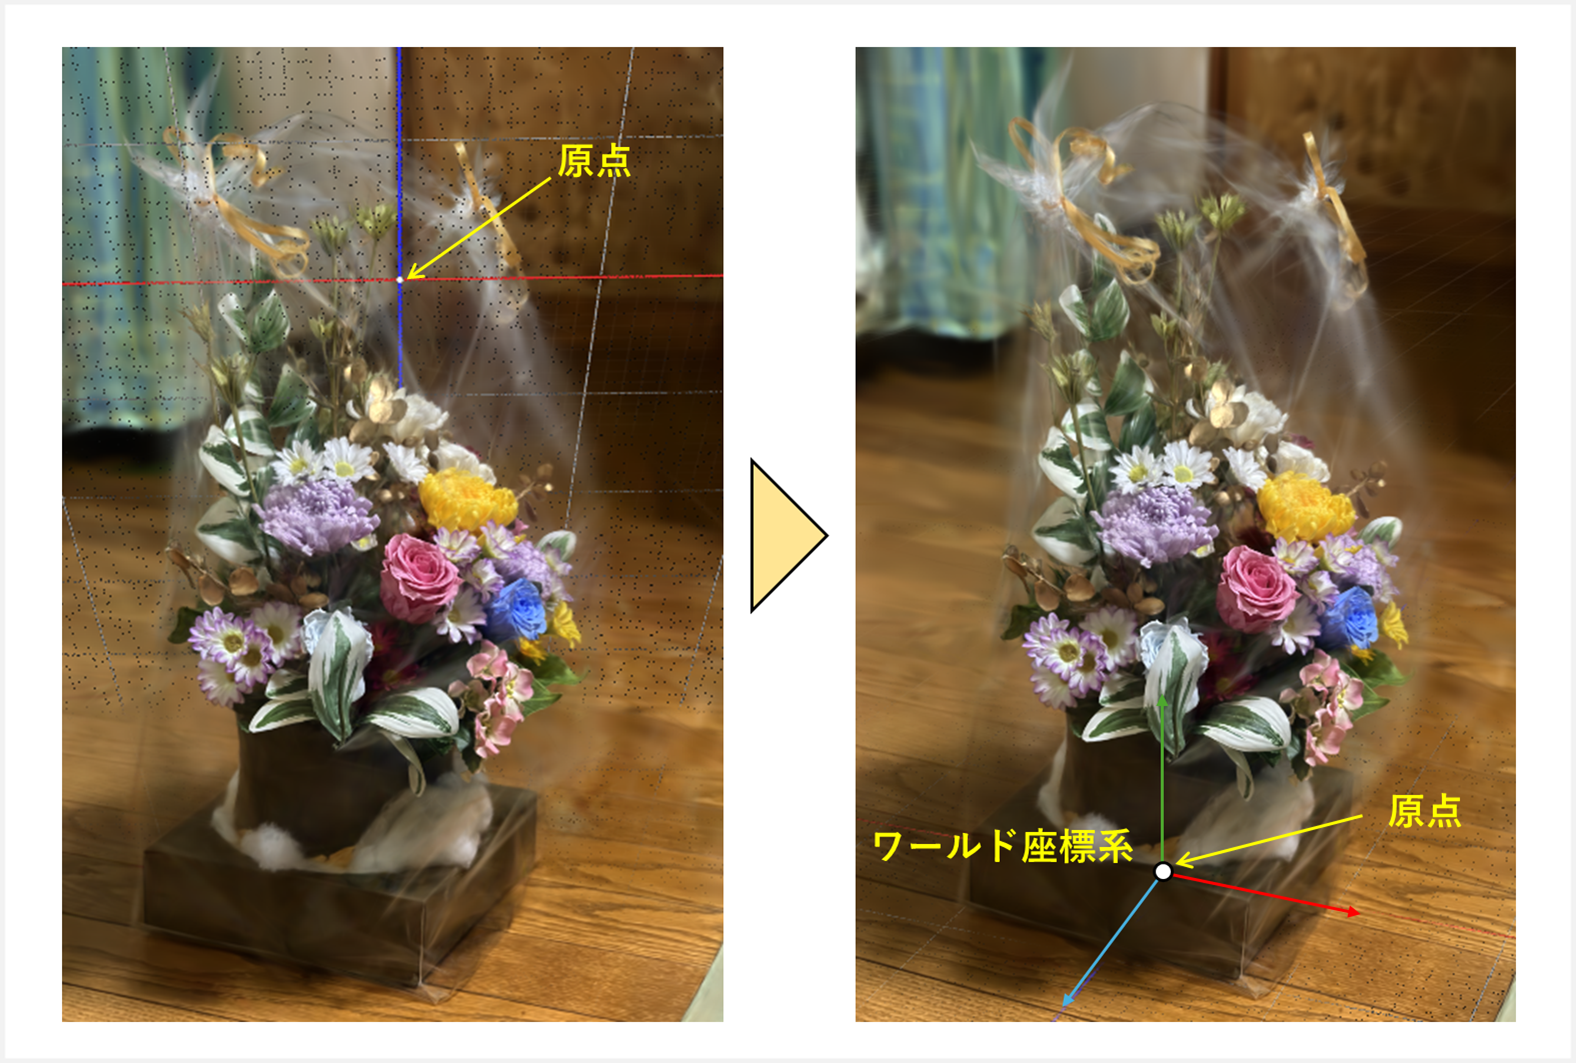
- Change the origin position and coordinate system orientation
When importing, the world coordinate origin often ends up in an unintended position or orientation, making editing inconvenient. First, use the translation and rotation tools to align the subject with the world coordinate system.
- Select and delete the background region around the subject
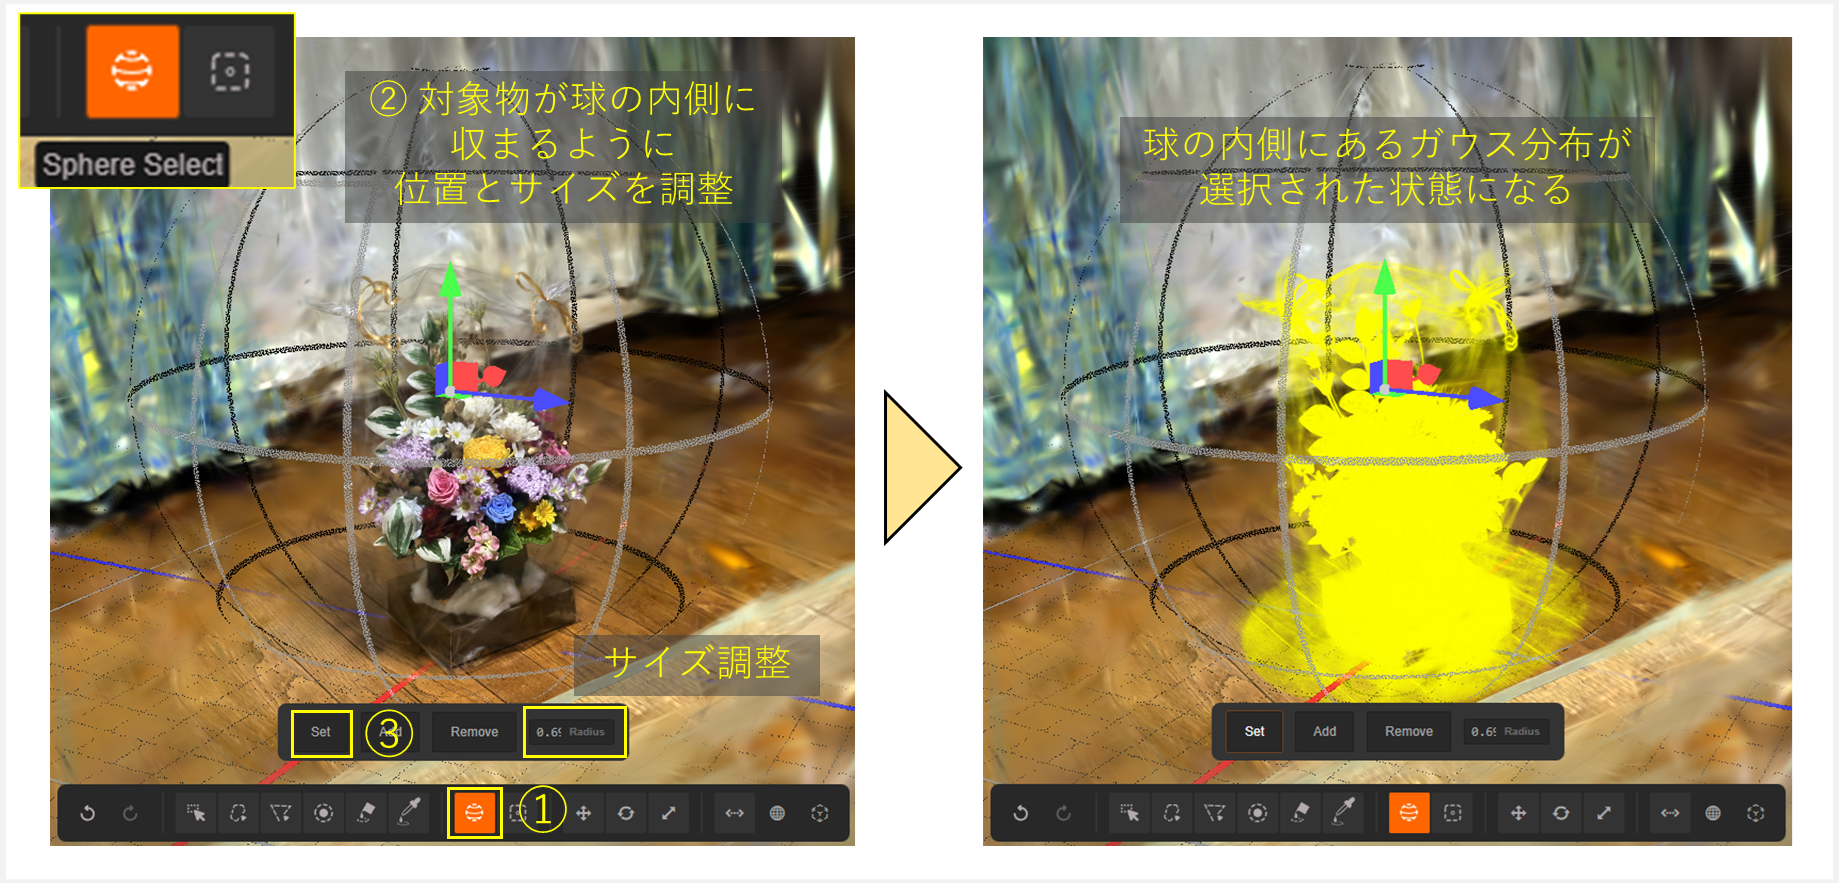
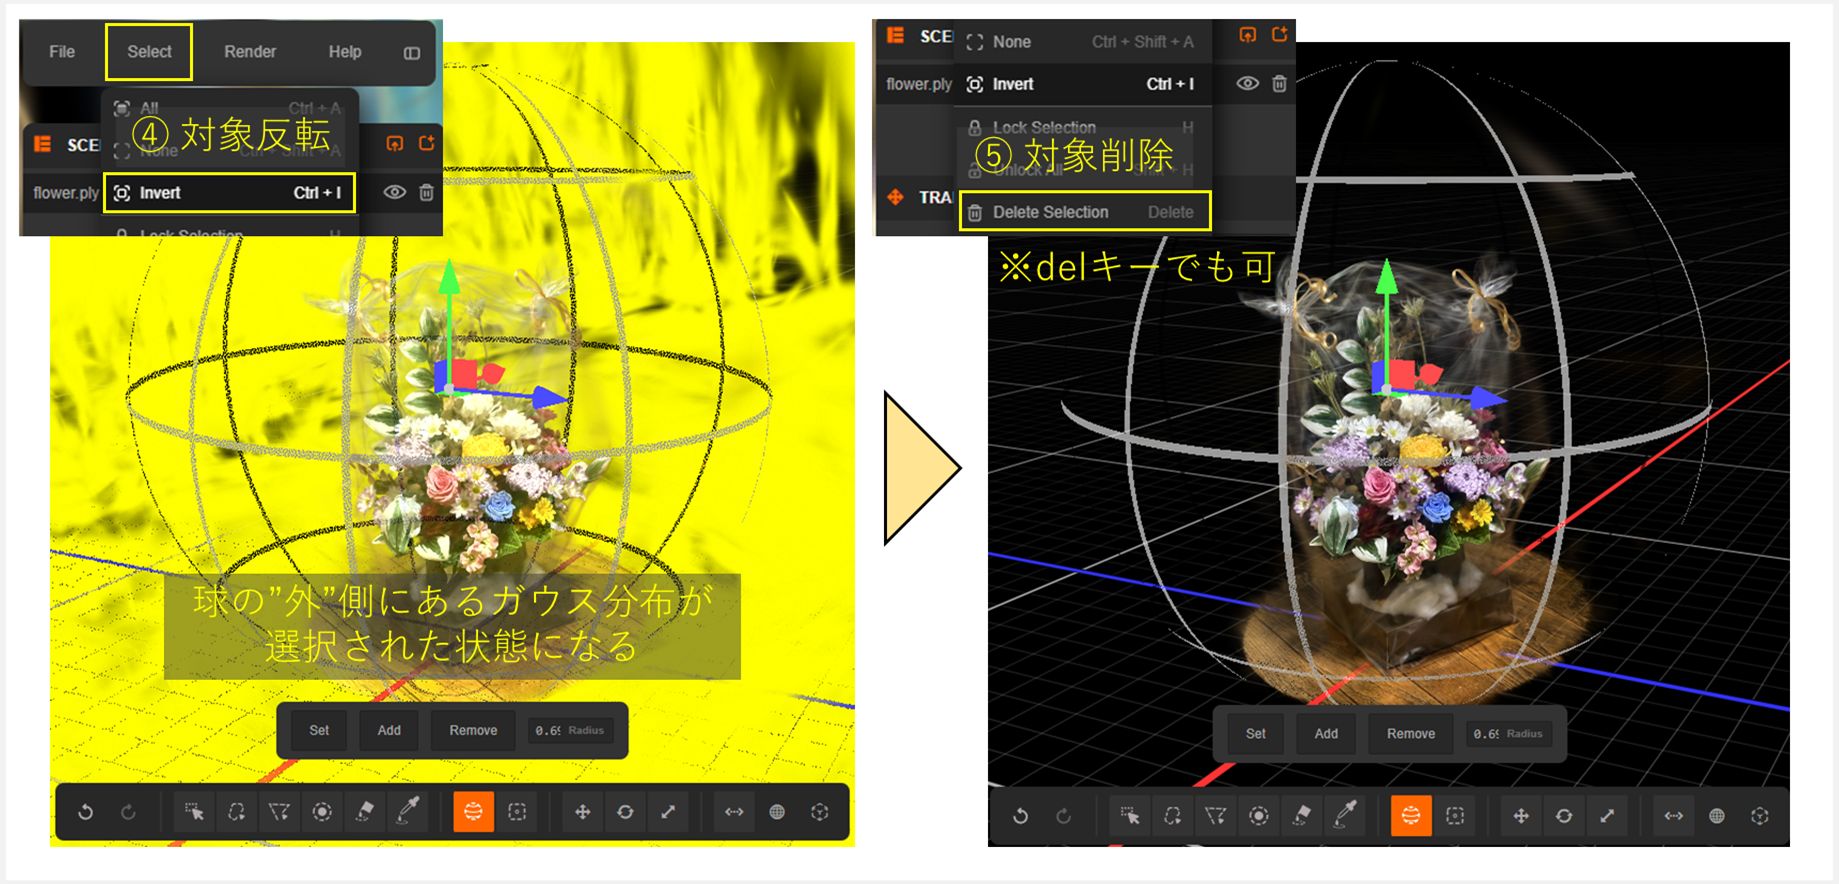
- Select and delete individual unwanted Gaussian distributions
- Change the origin position and coordinate system orientation
- Save the edited 3DGS.
Conclusion
#This article focused on the steps to create high-resolution 3DGS—a technique for realistically digitally reconstructing 3D objects and spaces—using free tools. Going forward, I plan to delve deeper into the technology, discuss 3DGS challenges, and explain the latest research.
Bonus
#All of the applications in this article are currently free, but because environment setup is involved and a GPU is required, they may not feel very “easy.” Here are some other options:
- If you don’t mind paying and want a simpler process, try Postshot
- If you want to quickly create with just your smartphone, try Scaniverse
| Option | Ease of Use | Achievable Resolution | Parameter Flexibility | GPU Required | Notes |
|---|---|---|---|---|---|
| COLMAP+LFS | △ | 〇~◎ | ◎ | Required | Free; allows detailed tuning |
| Postshot | 〇 | 〇~◎ | 〇 | Required | Paid; easily creates high-quality 3DGS |
| Scaniverse | ◎ | △~〇 | △ | Not required | Free; can be created with smartphone only |
However, LichtFeldStudio is under active development as of January 2026, when this article was written, and improvements in ease of use and functionality are expected.