DJI Drone Development Tips - Application Binding for Custom Payload Devices
Back to TopTo reach a broader audience, this article has been translated from Japanese.
You can find the original version here.
Introduction
#At Mamezou, we are engaged in the development of a solar panel cleaning robot system.
This system consists of a robot that cleans solar panels and a drone that transports the robot. In this article, we introduce Application Binding in the drone-side development technology, the Payload SDK.
Please also see the following article for the Payload SDK:
About Application Binding
#For some aircraft, before using a payload device, the following procedure called Application Binding is required:
- Connect the aircraft and the payload device and launch the application developed with the Payload SDK
- The Payload SDK initialization sequence waits for binding with the aircraft
- Connect the aircraft and a PC and launch DJI Assistant 2
- A list of payload devices waiting for binding is displayed
- Bind the aircraft and the payload device using DJI Assistant 2
- The aircraft starts responding in the SDK initialization sequence, and the SDK API becomes available
The information of the bound payload device is stored persistently in the aircraft, and the corresponding payload device can be used thereafter.
Aircraft Requiring Application Binding
#The following is a list of expansion ports provided by current aircraft, excerpted from Standard Hardware Port Introduction.
| Aircraft | Port Name | Supports App Binding |
|---|---|---|
| FlyCart 100 | E-Port Lite | – |
| FlyCart 30 | E-Port Lite | – |
| Matrice 4D/4TD | E-Port, E-Port Lite | ✓ |
| Matrice 4E/4T | E-Port, E-Port Lite | ✓ |
| Matrice 3D/3TD | E-Port, E-Port Lite | – |
| Matrice 30/30T | E-Port | – |
| Mavic 3E/3T | E-Port | – |
| M400 | E-Port V2 | ✓ |
| M350 RTK | E-Port | – |
| M350 RTK | Gimbal Port | ✓ |
| M300 RTK | OSDK Port | – |
| M300 RTK | Gimbal Port | ✓ |
If you connect a payload device to an expansion port on an aircraft with a check in "Supports App Binding", binding is required.
Payload devices connected via E-Port, E-Port V2, or Gimbal Port are subject to this, but for the Matrice series, this is required starting with the Matrice 4E/4T models. We can expect that for aircraft released in the future (excluding E-Port Lite), binding will generally be required for payload devices.
SDK Authentication Chip
#Third-party payload devices to be bound must be equipped with a DJI SDK Authentication Chip (abbreviated DJI SDK CC).
You can purchase a set of 50 from the DJI Store.
The following photo shows the purchased authentication chips in a packaged, elongated sheet. The item placed on the bag is an adapter for mounting the authentication chip (described later).
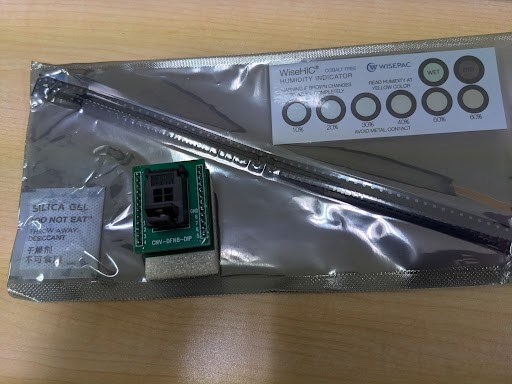
The authentication chip is a hardware security module that authenticates and encrypts communication between the aircraft and the third-party payload device.
With this authentication chip, the aircraft can identify each payload device, and the information of bound payload devices (authentication chip data) is persistently stored in the aircraft.
This chip is provided for third parties, but we believe that DJI’s own payload devices also incorporate a similar authentication chip or equivalent mechanism.
Connecting the SDK Authentication Chip
#The SDK Certified Chip Quick Start includes a connection example for Raspberry Pi 4B, so we will explain based on this.
SDK Authentication Chip Interface
#The authentication chip communicates with the host (Raspberry Pi) via an I²C interface.
The diagram below shows the pin layout of the authentication chip.

- VCC: Power input pin (operating voltage range: 1.62 V – 5.5 V)
- GND: Ground pin
- NRST: External reset pin
- I2C_SCL: I²C bus interface pin (Serial Clock Line)
- I2C_SDA: I²C bus interface pin (Serial Data Line)
The chip’s package type is DFN8 2×3. Since its outer dimensions are 2 mm × 3 mm and it is extremely small, directly wiring to it is difficult. Therefore, we use a conversion adapter that connects to a DIP8 socket, as shown in the following photo.
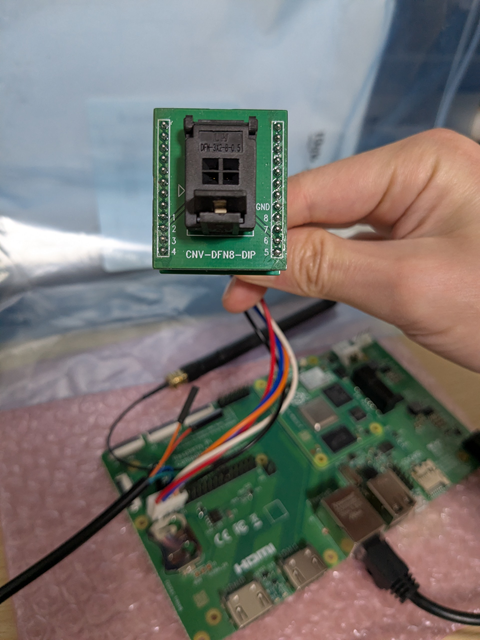
Connecting the SDK Authentication Chip to Raspberry Pi
#Connect the pins of the Raspberry Pi’s 40-pin GPIO header to the authentication chip.
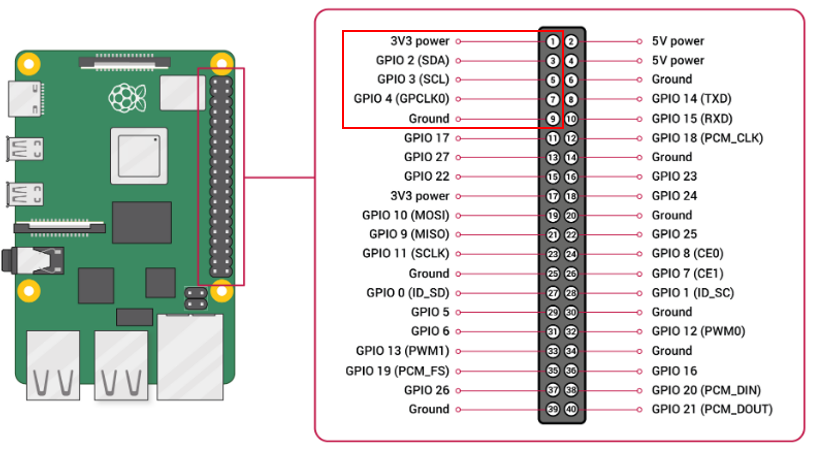
The pin correspondence between the authentication chip and the GPIO is as follows:
| Authentication Chip | GPIO |
|---|---|
| 1pin(7816IO) | (NC) |
| 2pin(Vcc) | 1pin(3.3V power) |
| 3pin(7816CLK) | (NC) |
| 4pin(GND) | 9pin(Ground) |
| 5pin(I2C_SDA) | 3pin(GPIO2:SDA) |
| 6pin(NC) | (NC) |
| 7pin(I2C_SCL) | 5pin(GPIO3:SCL) |
| 8pin(NRST) | 7pin(GPIO4:GPCLK0) |
| 9pin(GND) | 9pin(Ground) |
After enabling I²C in the device tree, you can verify the I²C address by using commands like i2cdetect.
In the following example, the device assigned to the authentication chip is /dev/i2c-1.
$ ls /dev/i2c-*
/dev/i2c-1  /dev/i2c-20  /dev/i2c-21
The authentication chip will not respond if only 3.3 V is supplied to Vcc.
$ sudo i2cdetect -y 1
     0  1  2  3  4  5  6  7  8  9  a  b  c  d  e  f
00:                         -- -- -- -- -- -- -- --
10: -- -- -- -- -- -- -- -- -- -- -- -- -- -- -- --
20: -- -- -- -- -- -- -- -- -- -- -- -- -- -- -- --
30: -- -- -- -- -- -- -- -- -- -- -- -- -- -- -- --
40: -- -- -- -- -- -- -- -- -- -- -- -- -- -- -- --
50: -- -- -- -- -- -- -- -- -- -- -- -- -- -- -- --
60: -- -- -- -- -- -- -- -- -- -- -- -- -- -- -- --
70: -- -- -- -- -- -- -- --
As shown below, if you set GPIO4 (connected to the chip’s NRST) to LOW and then to HIGH, the authentication chip is reset, and the I²C address 0x2a is detected.
$ sudo gpioset gpiochip0 4=0
$ sudo i2cdetect -y 1
     0  1  2  3  4  5  6  7  8  9  a  b  c  d  e  f
00:                         -- -- -- -- -- -- -- --
...
70: -- -- --

$ sudo gpioset gpiochip0 4=1
$ sudo i2cdetect -y 1
     0  1  2  3  4  5  6  7  8  9  a  b  c  d  e  f
00:                         -- -- -- -- -- -- -- --
10: -- -- -- -- -- -- -- -- -- -- -- -- -- -- -- --
20: -- -- -- -- -- -- -- -- 2a -- -- -- -- -- -- --
30: -- -- -- -- -- -- -- -- -- -- -- -- -- -- -- --
40: -- -- -- -- -- -- -- -- -- -- -- -- -- -- -- --
50: -- -- -- -- -- -- -- -- -- -- -- -- -- -- -- --
60: -- -- -- -- -- -- -- -- -- -- -- -- -- -- -- --
70: -- -- -- -- -- -- -- --
Registering a Payload SDK Application on DJI Developer Center
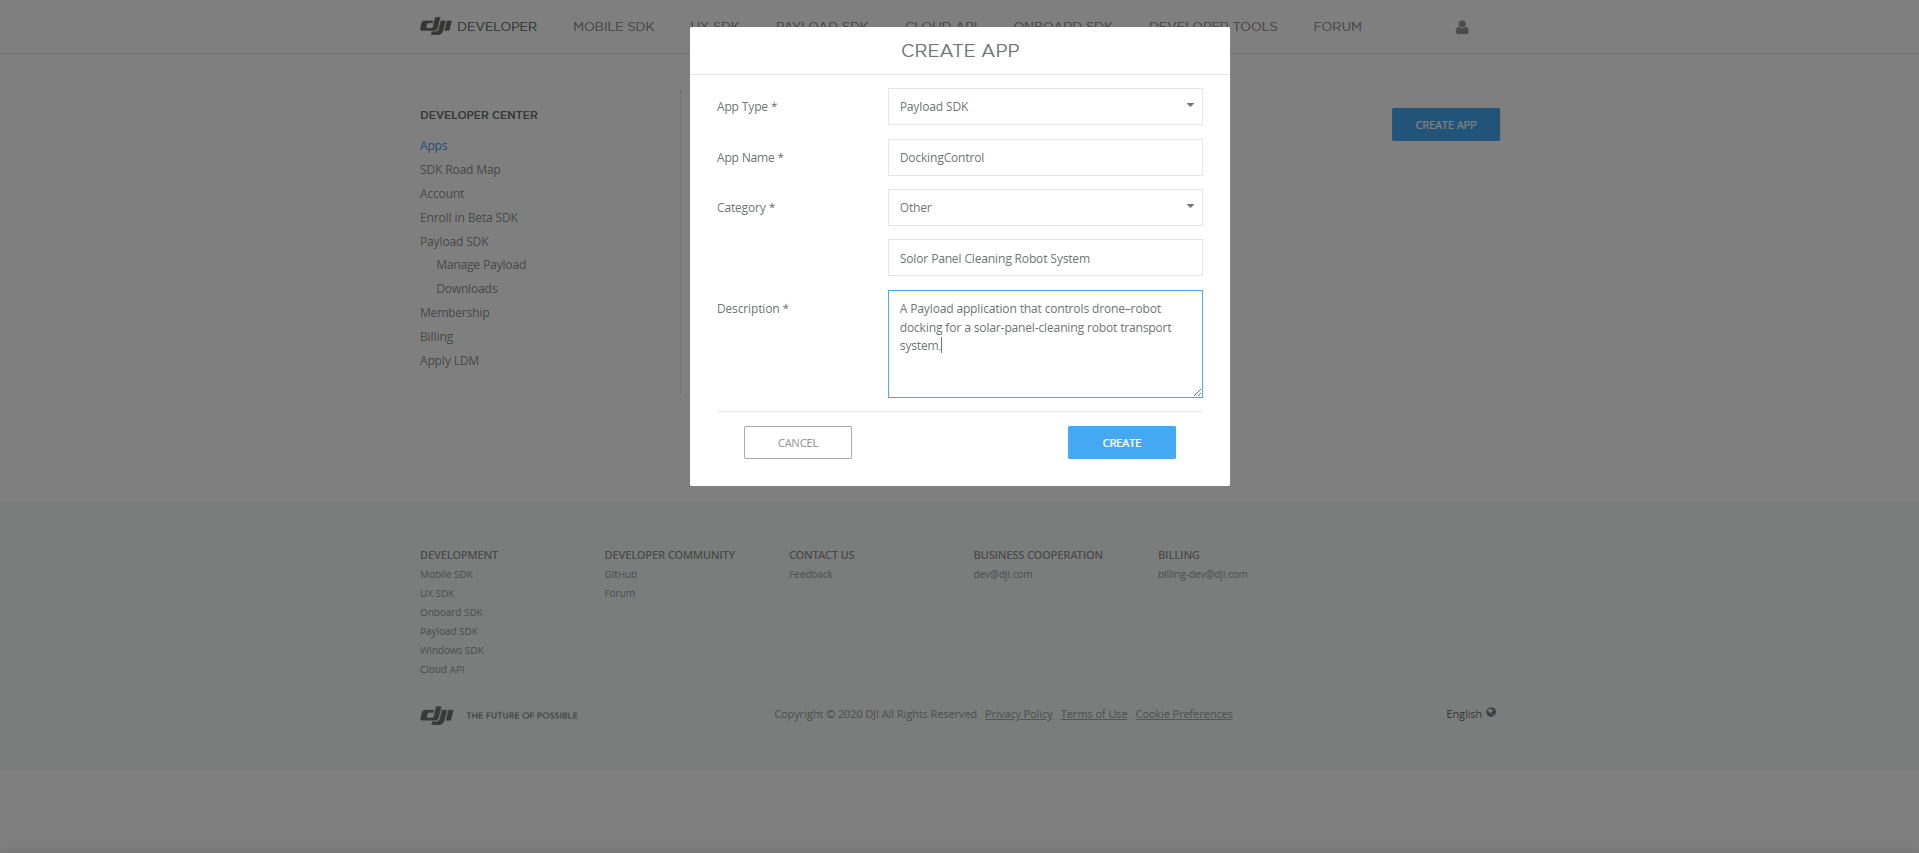
#Before binding, you need to register the Payload SDK application on the DJI Developer Center.
Enter the application information.
After registering the application, clicking Send Email will send an activation invitation email.
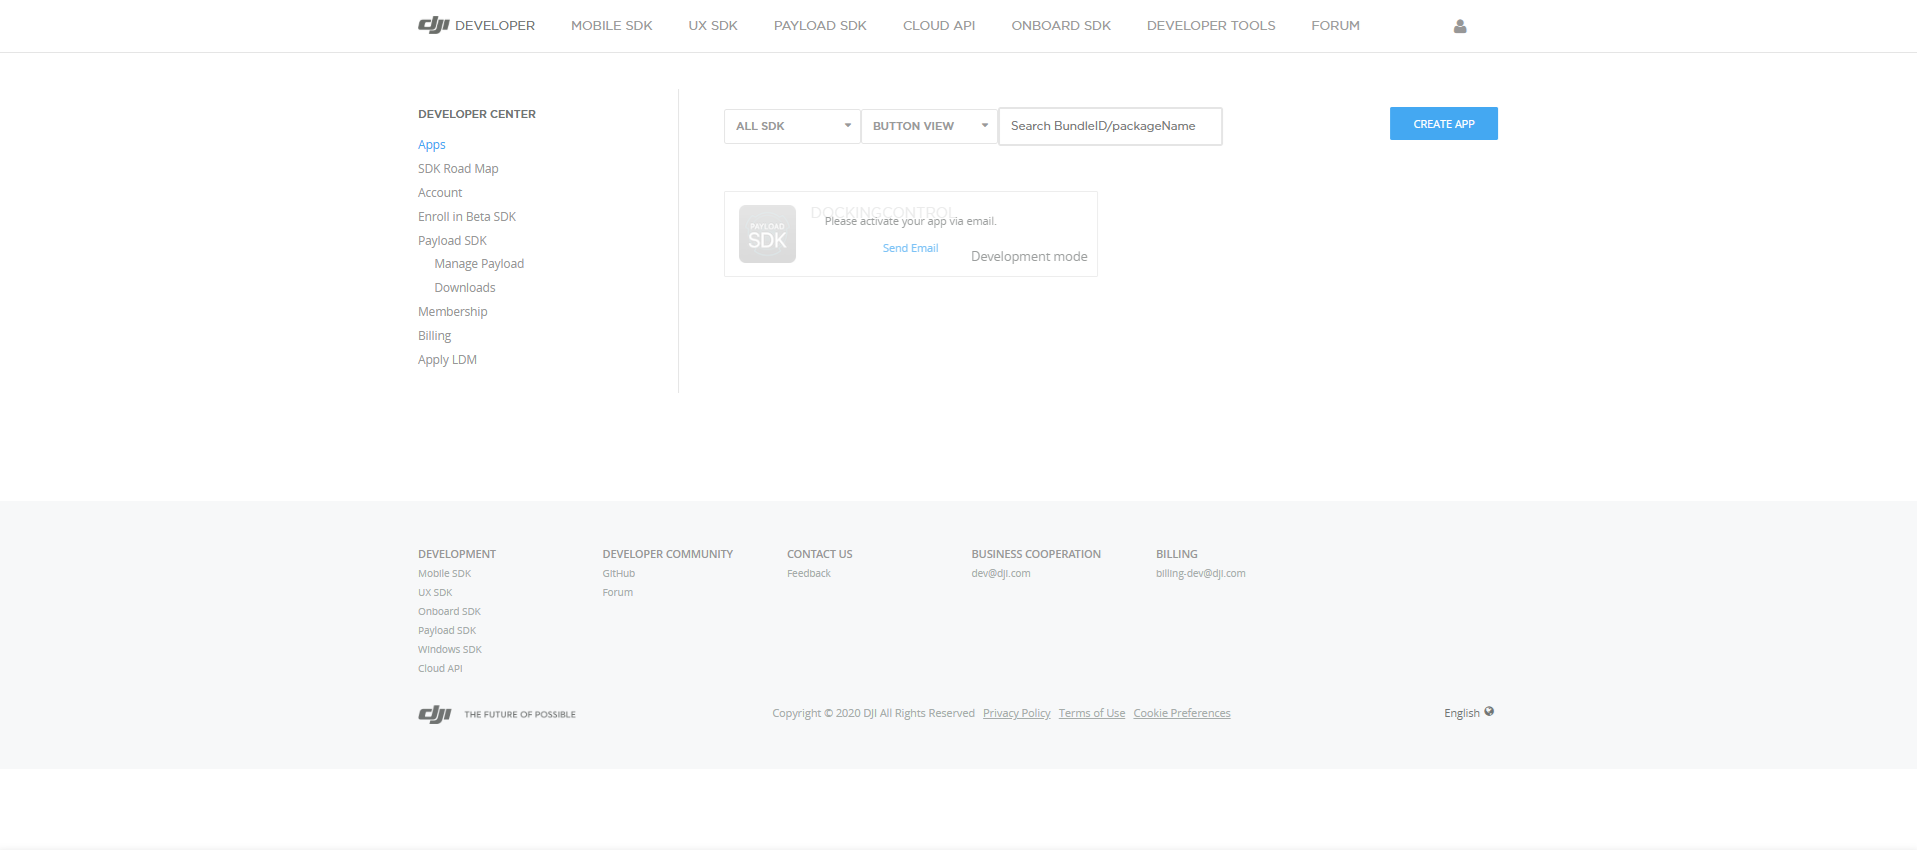
Opening the link in the email completes activation, and the ID and KEY are displayed.
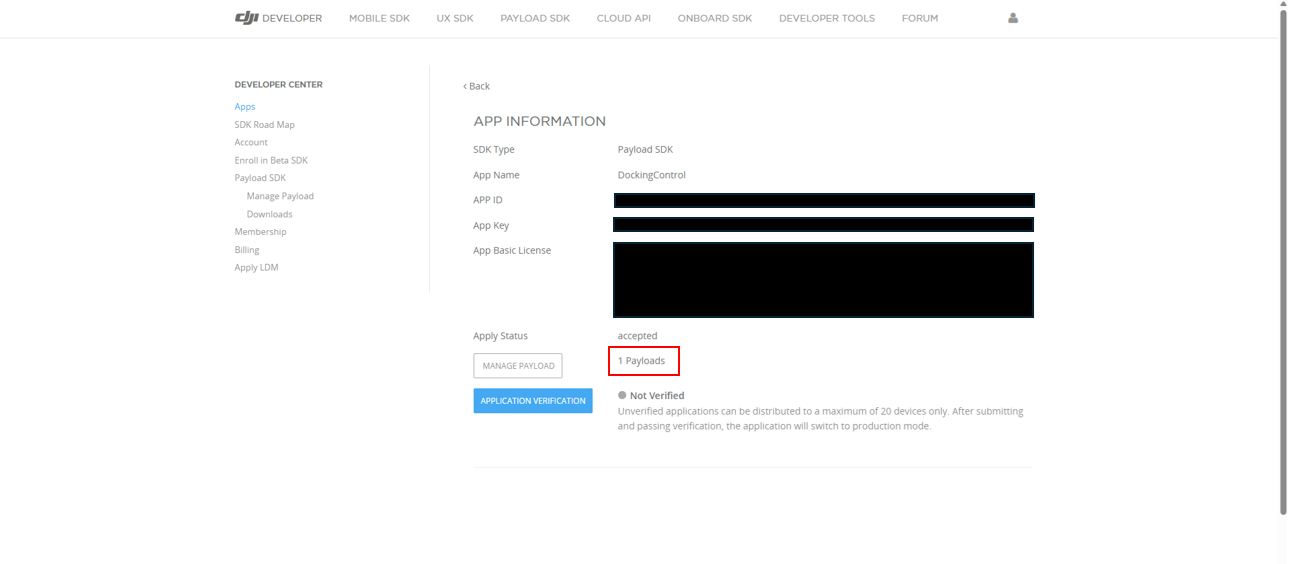
As stated on the page, you can bind up to 20 payload devices to the registered application.
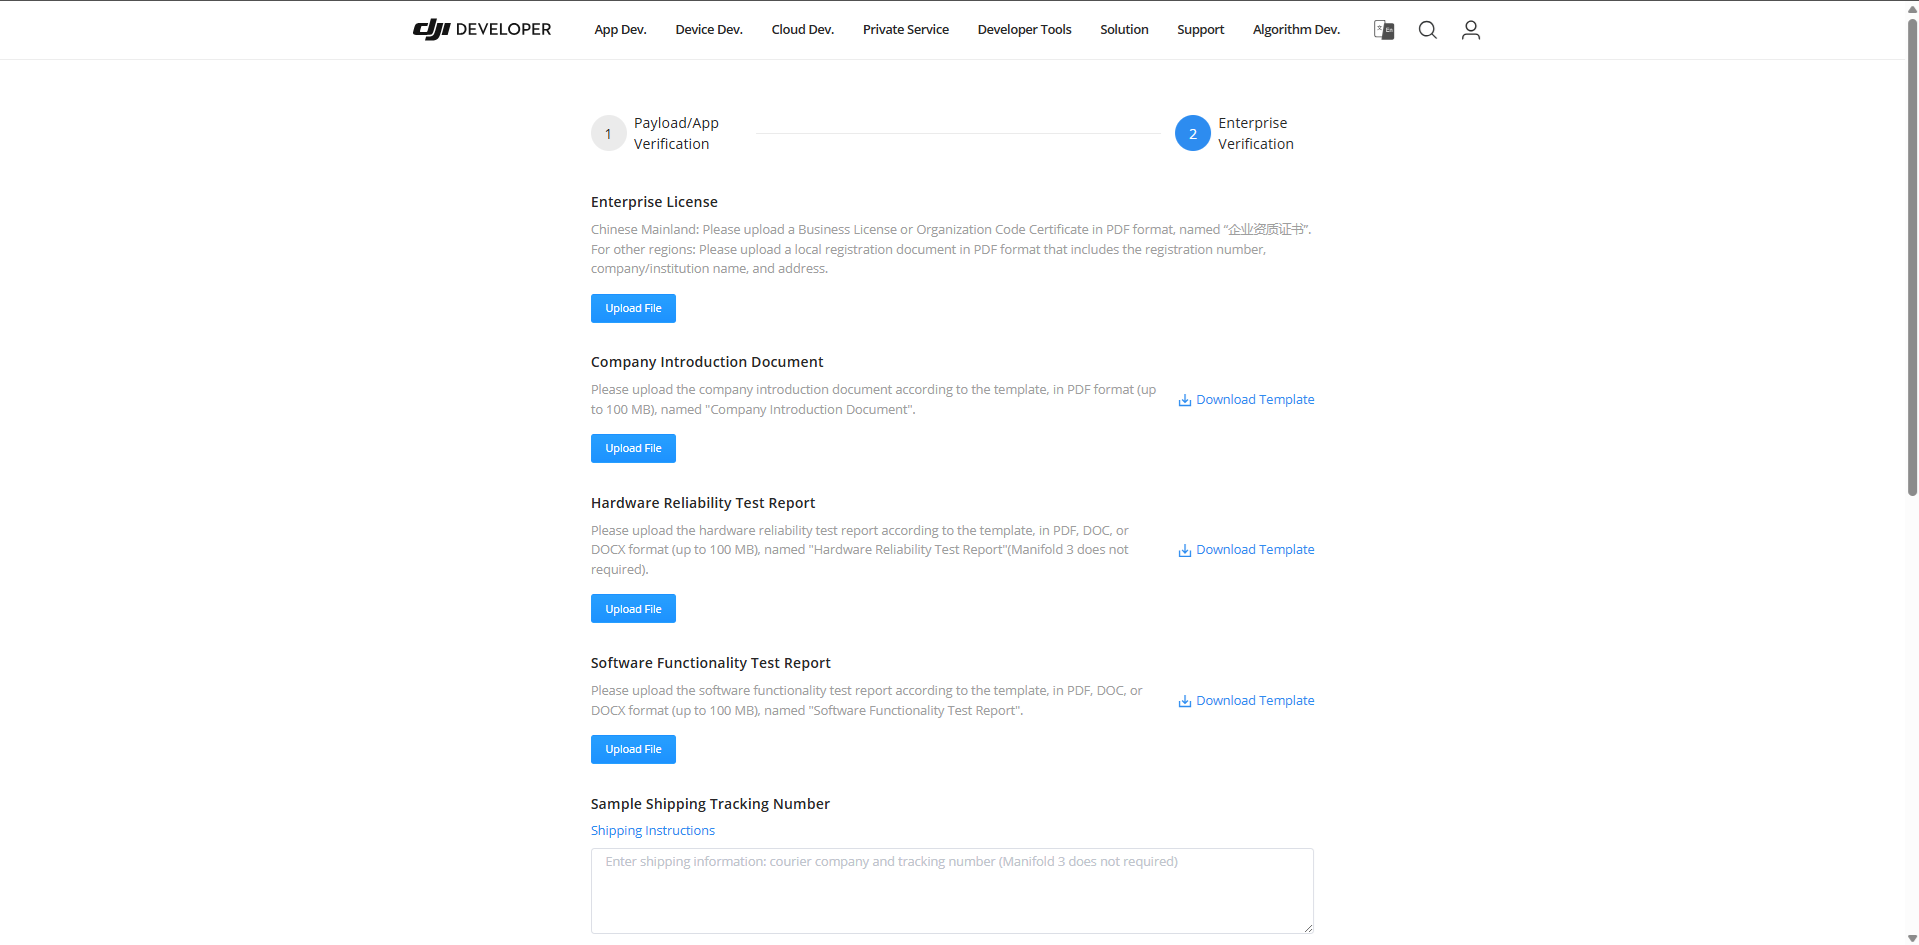
On the Application Verification page, you can submit various documents such as a company description and payload device test reports for review. Once approved, the device limit is lifted. While this limit is not problematic in early development, when mass-producing payload devices, prepare test reports and apply for verification.
Configuring the Payload SDK Application
#Here, we explain the SDK configuration using the sample application for Raspberry Pi in the Payload SDK as an example.
Set the application information registered on the DJI Developer Center in the following file:
Payload-SDK/samples/sample_c++/platform/linux/raspberry_pi/application/dji_sdk_app_info.h
/* Exported constants --------------------------------------------------------*/
// ATTENTION: User must goto https://developer.dji.com/user/apps/#all to create your own dji sdk application, get dji sdk application
// information then fill in the application information here.
#define USER_APP_NAME               "your_app_name"
#define USER_APP_ID                 "your_app_id"
#define USER_APP_KEY                "your_app_key"
#define USER_APP_LICENSE            "your_app_license"
#define USER_DEVELOPER_ACCOUNT      "your_developer_account"
#define USER_BAUD_RATE              "460800"
| Constant Name | Description | Example |
|---|---|---|
| USER_APP_NAME | Corresponds to the App Name field in the DJI Developer Center registration |
DockingControl |
| USER_APP_ID | Corresponds to the App ID field in the DJI Developer Center registration |
(omitted) |
| USER_APP_KEY | Corresponds to the App Key field in the DJI Developer Center registration |
(omitted) |
| USER_APP_LICENSE | Corresponds to the App Basic License field in the DJI Developer Center |
(omitted) |
| USER_DEVELOPER_ACCOUNT | Your account name on the DJI Developer Center | masayuki-kono |
If you start the sample application and the following log is repeatedly output, it's OK (waiting for binding).
[Error] dji_auth_sha256_rsa_verify.c:137 The DJI SDK CC has not binded. Please check the bind state of the DJI SDK CC and bind it.
It seems that the sample code for Raspberry Pi is not maintained, and as-is it will output the following error and fail to communicate with the authentication chip:
Connect DJI SDK CC device failed, errno: 0x30000002
The cause is that writing to address 0x2A returns -1 from ioctl(I2C_RDWR) and the slave does not return ACK. In HalI2c_ResetDevice(), immediately after resetting GPIO4 to LOW→25 ms→HIGH, the code opens the device and writes to it. It seems the first transaction runs before the chip has fully recovered from reset. Because there appears to be insufficient wait time for the chip to respond to I²C after reset release, we improved this by waiting 50 ms after releasing the reset before performing I²C access.
I have uploaded the modified code in my forked Payload SDK repository for reference. I also added debug log output, so observing the data exchanged with the chip should deepen your understanding.
Connecting the Aircraft and the Payload Device
#This time we used the Matrice 4E.
The connection image of each device is as follows:
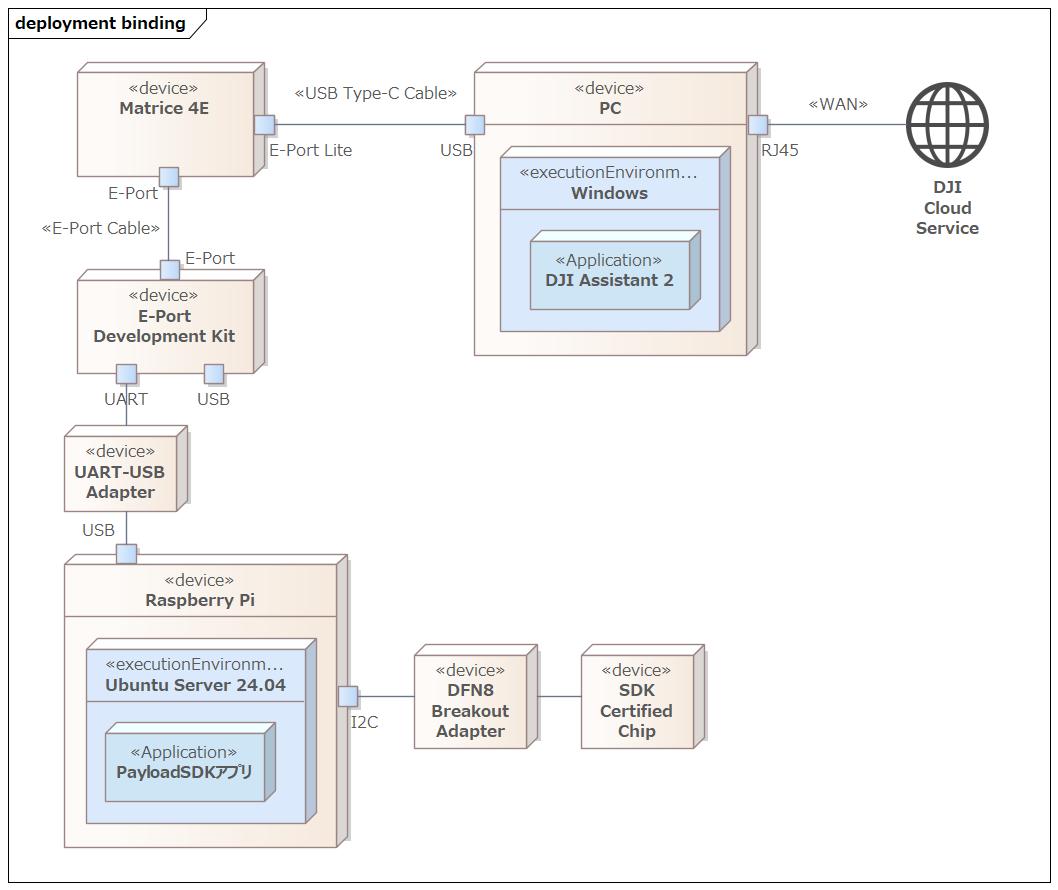
- Matrice 4E
- Aircraft used for Application Binding
- PC
- Environment for running DJI Assistant 2
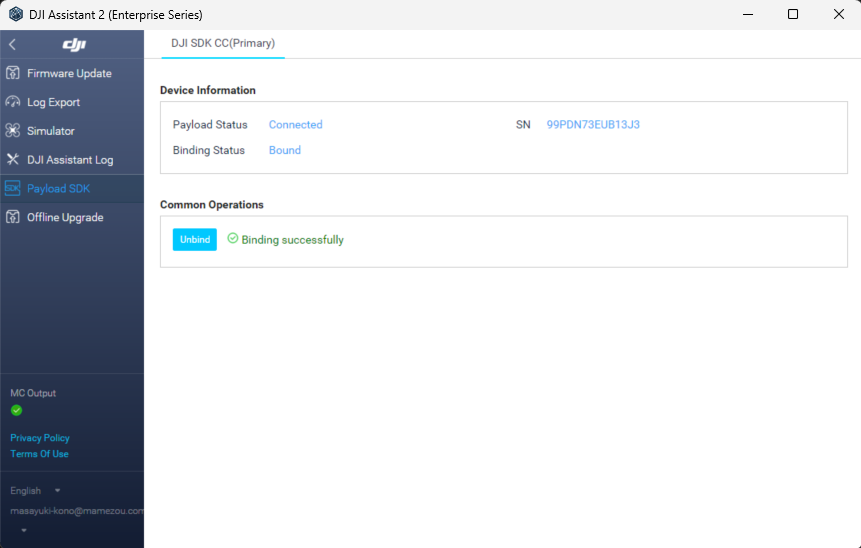
- DJI Assistant 2 varies by aircraft; for Matrice 4E, use the Enterprise Series
- DJI Assistant 2 must be connected to the Internet to communicate with DJI’s cloud services
- E-Port Development Kit
- Adapter board for connecting the aircraft and payload device
- UART-USB Adapter
- Here, we use an FTDI UART-USB converter adapter. If connecting directly to Raspberry Pi GPIO (UART pins), this is not needed.
- Raspberry Pi
- Environment for running the Payload SDK application
- DFN8 Breakout Adapter
- Breakout adapter that converts a DFN8 (2×3 mm) surface-mount IC to a DIP8-compatible pin layout
- SDK Certified Chip
E-Port Development Kit
#On the Development Kit board there is a DIP switch called E-Port switch; turn this ON to enable UART output.
The USB ID switch (Device|Host) DIP switch needs to be set to Host when using RNDIS or Bulk transfer over USB. Since we are only using UART this time, no specific setting is required (either position works).
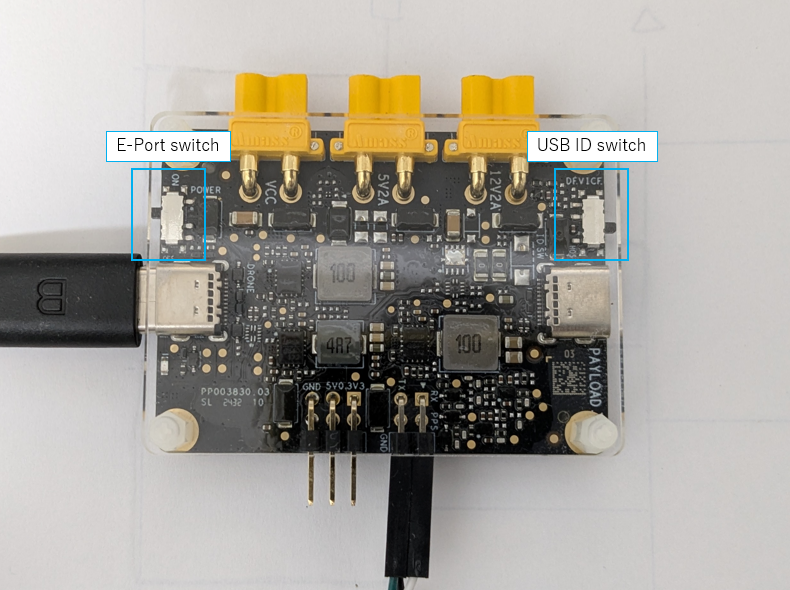
Although the E-Port connector is reversible in hardware, there is a specified orientation for the aircraft’s E-Port connector and the Development Kit connector when connecting them.
The following is an excerpt from Connect Development Board to E-Port:
Note: The E-Port coaxial USB-C cable doesn't have a foolproof design, allowing A/B side to be reversibly connected.
Due to pin layout differences in the aircraft's USB-C, if the coaxial cable is reversed, the other end also needs to be flipped correspondingly.
If not flipped correspondingly, the E-Port Development Kit can not power up and communicate.
As shown in the photo below, the connectors are labeled A/B, and you need to flip them such that if the aircraft side is A, the development kit side is B, and if the aircraft side is B, the development kit side is A.

The DJI documentation does not make it clear which orientation is correct, so we tried both and identified the one that works (the photo shows the working configuration).
Performing Application Binding
#Make sure the Payload SDK application repeatedly outputs the following log (waiting for binding):
[Error] dji_auth_sha256_rsa_verify.c:137 The DJI SDK CC has not binded. Please check the bind state of the DJI SDK CC and bind it.
In this state, open DJI Assistant 2 on the PC connected to the aircraft via E-Port Lite, and the Payload SDK menu will display the following:

Click the Bind button to complete the binding.
Once binding is complete, the startup log of the sample application will look like this:
0.016	            core	[Info]	               dji_core.c:113  Payload SDK Version : V3.15.0-beta.0-build.2318 Dec 10 2025 17:27:05
1.075	         adapter	[Info]	     dji_access_adapter.c:351  Identify mount position type is Extension Port Type
1.075	         adapter	[Info]	     dji_access_adapter.c:371  Identify aircraft series is Matrice 4 Series
1.578	         adapter	[Info]	     dji_access_adapter.c:493  Identity uart0 baudrate is 921600 bps
1.582	            core	[Info]	    dji_identity_verify.c:627  Updating dji sdk policy file...
2.582	            core	[Info]	    dji_identity_verify.c:635  Update dji sdk policy file successfully
2.627	            core	[Info]	               dji_core.c:261  Identify AircraftType = Matrice 4E, MountPosition = Extension Port, SdkAdapterType = None
2.748	            auth	[Info]	        dji_sdk_cc_auth.c:86   Get DJI SDK CC serial num: 99PDN73EUB13J3
4.812	          linker	[Warn]	            dji_command.c:1025 <0xd5d0>Command async send retry: index = 0, retryTimes = 1, 0x0A06->0x0F01(0x002F) 0x3C13
5.945	          linker	[Warn]	            dji_command.c:910  Received invalid ack,<0xd5d0> 0x0F01(0x002F)->0x0A06(0x00CA) 0x3C13
6.322	         adapter	[Info]	    dji_identity_verify.c:257  the license level is basic
6.322	            core	[Info]	       dji_product_info.c:187  Set alias: PSDK_APPALIAS
6.942	            user	[Info]	            test_widget.c:141  widget file: /home/dev/DockingController/third_party/Payload-SDK/samples/sample_c/module_sample/widget/widget_file/en_big_screen
6.952	            user	[Info]	    test_widget_speaker.c:594  Set widget speaker volume: 60
6.952	            user	[Warn]	    test_widget_speaker.c:613  No audio device found, please add audio device and init speaker volume here!!!
12.455	            core	[Info]	               dji_core.c:328  Start dji sdk application
12.455	            user	[Info]	          application.cpp:372  Application start.

| Available commands:                                                                              |
| [0] Fc subscribe sample - subscribe quaternion and gps data                                      |
| [1] Flight controller sample - you can control flying by PSDK                                    |
| [2] Hms info manager sample - get health manger system info by language                          |
| [a] Gimbal manager sample - you can control gimbal by PSDK                                       |
| [c] Camera stream view sample - display the camera video stream                                  |
| [d] Stereo vision view sample - display the stereo image                                         |
| [e] Run camera manager sample - you can test camera's functions interactively                    |
| [f] Start rtk positioning sample - you can receive rtk rtcm data when rtk signal is ok           |
| [g] Request Lidar data sample - Request Lidar data and store the point cloud data as pcd files   |
| [h] Request Radar data sample - Request radar data                                               |
| [l] Run widget states manager sample, control widget states on other payload                     |
If you enable logging of communication data in hal_i2c.c, you can see that the SDK continues to communicate with the authentication chip periodically even after initialization is complete, and each time it exchanges different data.
Since the official protocol specification is not published, the following is speculative, but we believe it follows a challenge-response style authentication flow:
- Aircraft → Authentication chip: Send challenge data (including random values or timestamps)
- Authentication chip → Aircraft: Return signed response (using the chip's unique private key)
- Aircraft verifies the signature using the authentication chip's public key
This allows the aircraft to identify third-party payload devices as legitimate, and only bound devices can use the Payload SDK.
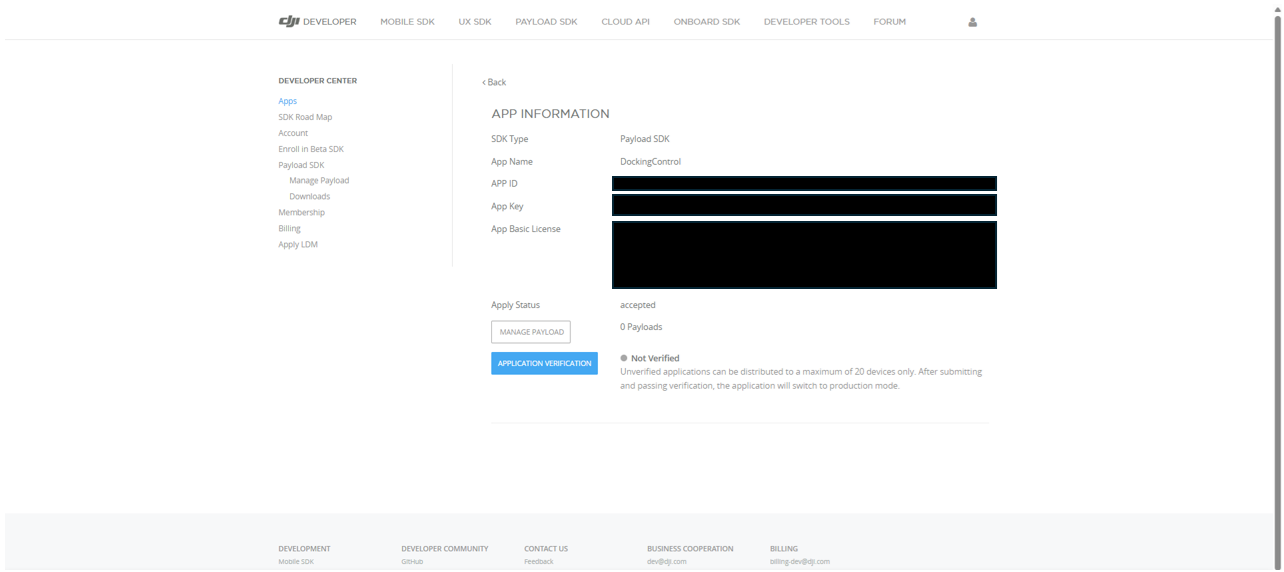
After binding is complete, if you open the DJI Developer Center, you should see 1 Payloads displayed, confirming that the count has increased.
Conclusion
#Application Binding is a relatively new specification that appeared starting with the Matrice 4E/4T (released in January 2025). Therefore, even looking at DJI’s official site, it's difficult to grasp the entire picture, and the specific procedures can be hard to understand.
In this article, we explained the list of aircraft that require Application Binding, how to connect the SDK authentication chip (using Raspberry Pi as an example), and how to register the application on the Developer Center. We also walked through the process from connecting the aircraft, payload, and PC to performing binding via DJI Assistant 2.
Application Binding is likely to become standard on future aircraft. If you're working on custom payload development, please use this article as a guide and give it a try.